Tutorial Hello World
Mandarin | Spanish | Russian | Japanese | Hungarian | Italian | Korean | German | French
The following tutorial assumes no prior knowledge of vvvv. Every single step you need to understand to complete the tutorial will be explained. Still you may be curious about some more details of dealing with vvvvs user interface. If you are missing something have a look at The User Interface in Detail. But don't forget to come back here!
We begin. Now really.
So you have just started vvvv and you are facing a gray window (if not, read the Introduction first) and you wonder where all the buttons, menus and scrollbars are waiting for you to click and drag. Here you are.
The Main Menu
Press your middle mouse button (or SPACE + right button if you don’t have a middle mouse button) and see the main menu. Here you find all the usual suspects.
For now just create a New Patch CTRL+P and notice that this patch appears with the top left corner exactly under your cursor. This is useful because you can now simply click and drag to position the patch in a fine place on screen.
Creating a Node
Now left double-click anywhere in the patch. The Node Browser appears with a seemingly endless list of nodes you can choose from. By starting to type a name the list gets filtered for your input helping you to look for specific functionality. If instead of an alphabetical listing you want to get an overview sorted by categories, simply right-click the text field. Now you're in the category-view of the nodebrowser. Here you can click any of the categories to see which nodes belong to it. Press the T button in the nodebrowsers topright corner to go back to its tag-view.
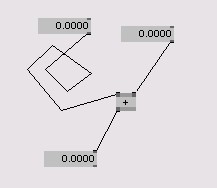
For now simply press + to filter for all nodes that have a + character in their name and then click on the one named: + (Value) (the word “Value” preceded by the sign “+”). Note: do not confuse it with + (Value Spectral) ?!
Also see this Video Tutorial.
Node Names and Categories
A node's name consists of several parts:
NodeName (Category Version1 Version2 ... VersionN)
Whereas the versions are optional every node is assigned a category followed in brackets after its name. This allows for several nodes named + to exist in parallel as long as they belong to different categories (e.g. + (Value), + (String), + (Color), ...).

Make sure you have created the correct node by hovering it with the cursor. A tooltip apears showing you the nodes exact name. You can always move any node to a new place in the patch by pressing the left mouse button while over it and dragging it around.
Now move your cursor over the input pins of the node to inspect their values. Note they are both set to zero, which is their default. You can change the values of the input pins by right-clicking. Enter a new value and press enter. Alternatively you can press the right mousebutton when over an input and drag up/down to change the value. After having changed the inputs you can inspect the result of the addition on the output pin.
IOBoxes
For easier handling of the input/output values you can create IOBoxes that help you both to enter and visualize values. Left double-click anywhere in the patch and rightclick to invoke the node list and look for a node called IOBox (Value Advanced). Click. Since you will need this node rather often it comes handy to know a shortcut for creating it. Right double-click anywhere in the patch and voila.
Connecting nodes
To connect the IOBoxes to the + (Value) node move the cursor over the output of an IOBox and left-click once. Notice that all pins that would accept this connection have grown. Now click anywhere in the patch if you want to make a segmented connection. Finally move your cursor over an input of the + (Value) node and click once more. Alternatively you can start a connection from an input pin and finish it on an output pin.
Also see this Video Tutorial.
Right-clicking after you have started a connection will cancel it. You can delete an existing connection between two pins by selecting it (left-click) and then either right-clicking on it or pressing DEL/ENTF or BACKSPACE.

Changing the values of IOBoxes works in the same way as changing the values of pins: drag in the middle of the IOBox with the right mouse button. If you want to reset an IOBox or a pin to its default value press ALT + right mouse button while over it.
Now take a break, and be back in 2 minutes!
Rendering
How will all that lead us to our desired hello world output you ask. Not at all so far. But now read on. To view any output we need a renderer node. There are several different renderer nodes (= possibilities to visualize/render different kinds of data) in vvvv. For our endeavor we need to create a Renderer (GDI).
As mentioned before. If you already know the name of a node you want to create, you can simply type its name after double-clicking in the patch. A pull-down menu appears that shows all nodes that start with the letters you’ve just entered. As soon as the node you want to create is highlighted you can hit enter. Or you can use up and down arrow keys to highlight your desired node.
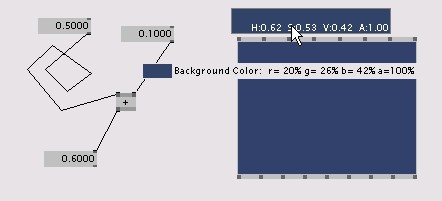
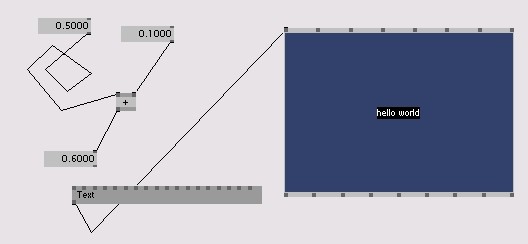
Renderer (GDI) is one of the nodes which have a window associated with them. The window pops up as you have created the node. To place the window as a box within the patch (as you can see in the screenshot below) make sure it is the active window and press ALT+2. Now the renderer should sit decent in the patch. You can bring the renderer back to windowed mode by pressing ALT+1.
To change the renderer's background color, find the input pin with the name Background Color and right-click it once to show a color-field. Inside this color-field you press
- the right mousebutton and drag up/down to change brightness,
- drag left/right to change the colors hue or
- press CTRL while dragging to change saturation.
Click anywhere in the patch to accept the new color.

To display some text in the renderer we need to create a Text (GDI) node and connect it to the renderer. Hover above its input pins and find the pin labeled Text. Right-click that pin and enter hello world. Writing exactly the phrase hello world is crucial to the positive completion of this tutorial. You owe this to programming history, so don't be childish.
Now find the ‘Font’ pin and click it to bring up a pull-down with all the fonts installed on your system. Here you can chose any font you like, history won't mind. But maybe Lucida Console is a fair choice.

Interaction
Finally lets get a little interactive and say we want to bind the size of the text to the vertical mouse movement but we also want the text size to be a minimum of 15 and a maximum of 50. Hurray.
Getting the mouse position is trivial since a renderer always outputs the coordinates of the mouse. The returned values are not in pixels but always within the range (-1, -1)/bottom left to (1, 1)/topright.
Mapping the y-coordinate directly to the size of the text would not make much sense because a text size below 1 would make the text invisible. We would get more thrilling results if we could use a wider range for the text size. Therefore we'll map the range of values that comes out of the renderer Y pin (i.e. -1 to 1) to the range 15 to 50.
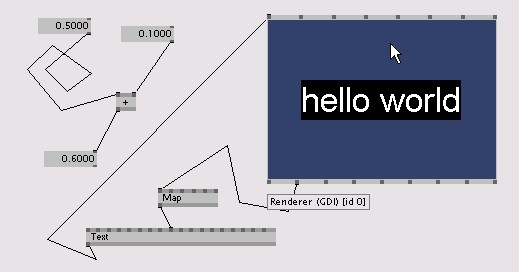
Such a mapping of value ranges is easily achieved with a node called Map (Value). Instead of creating a new node we can modify the no longer needed + (Value) by double-clicking on it and typing the name of the new node. Note that since the outputs of the + (Value) and the Map (Value) node have the same names, the connection to the IOBox is not lost.
Now you can connect the Y output of the renderer to the first pin of the Map (Value) node and the Map (Value) nodes output to the Text (GDI)'s Size pin.

For the Map (Value) doing the mapping we want to achieve, you have to set its input pins as follows:
- Source Minimum: -1
- Source Maximum: 1
- Destination Minimum: 15
- Destination Maximum: 50
- Mapping: Clamp
Moving the mouse up and down over the renderer should now interactively change the size of the text within the range 15-50.
Further experimenting
Your masterpiece is now finished and you can take a rest. If you see no way of stopping at this moment, you may want to play around a bit with the other nodes found in the categories GDI or simply view their HelpPatch.
Do also not forget to have a look at The User Interface in Detail, for it will teach you many additional tricks for faster and more intuitive patching.
There is an 'Hello World' tutorial, and a second, more advanced one in the Video Tutorial Section.
If you feel confident with what you've learned in this tutorial you should now continue with tutorial 2: Herr Inspektor.
anonymous user login
Shoutbox
~3d ago
~9d ago
~9d ago
~10d ago
~23d ago
~1mth ago
~1mth ago
~1mth ago
~1mth ago
~2mth ago

