
Tutorial Inspektor
Spanish | French | Russian | Japanese | Hungarian | Korean | Mandarin | Italian
The following tutorial assumes that you have already worked through tutorial 1: Hello World
Kottan ermittelt
In the last tutorial you have been shown how to change values directly on the pins of nodes. This is handy, of course. But you are still missing a more convenient way of getting an overview of all the values of a node.
CTRL+I invokes an inspector window. Selecting a node in the patch by left-clicking on it will list all the pins of the selected node in the Inspektor.
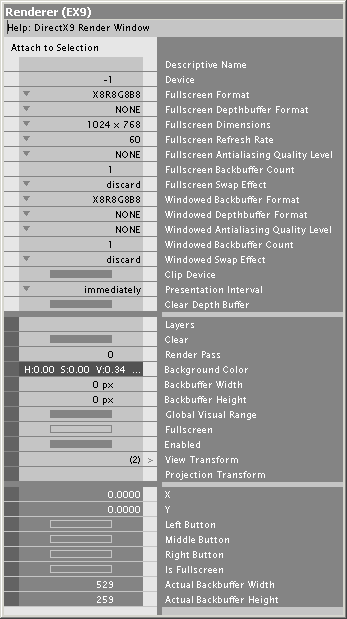
In the screenshot above you see that the inspektor lists even more pins in its window than you can see represented by black squares on the node itself. The pins you don't see in the patch are listed first. They are so called configuration pins and are not available in the patch because they are not supposed to be changed on a frame by frame basis. Therefore to change a configuration pin you have to use an inspektor.
Following in the list are the input and the output pins. You can change all the pins values with the right mousebutton. Right-drag on values and colors or click on strings and enums (= pulldown lists indicated by a small triangle).
The title of the Inspektor's window tells you the name of the selected node. Immidately followed by a short help text (which is btw. the same you get in the nodelist, when hovering above a node's name).
Manipulating several Nodes at once
Now create 3 IOBox (Color) nodes. The fastest way to do so would be to create one of those nodes, select it and then press CTRL+D (= duplicate) twice. Suppose you want to change the color of all nodes to the same new color. Instead of changing the color on each individual node you can select them all together by dragging a selection around them.
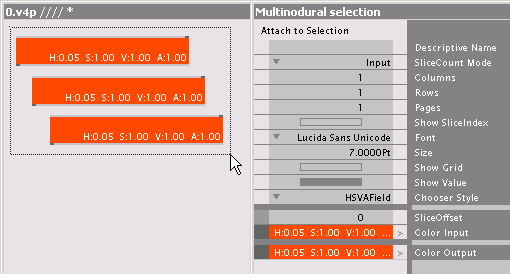
Note that the Inspektors title bar now tells you something of a multinodural selection meaning that he offers you a view on the pins of more than one node and you can change them all at once. If you select multiple nodes of different types the Inspektor will show you only the pins that all selected nodes have in common.
Using multiple Inspektors
As mentioned above it is cool to have always one Inspektor visible while you are patching. Sometimes though it comes handy to have multiple Inspektors open. Press CTRL+SHIFT+I to invoke a second Inspektor.
When you select a node all of the Inspektors will now inspect the same node. That doesn't make much sense. But you may already have noticed the button labeled Attach to Selection on top of each Inspektor. Pressing this button while a node is selected will lock the respective Inspektor. If you now select a new node the Inspektor will still show the other node that was selected while you pressed the button.
This way you can have for example one Inspektor attached to a node you are working with intensly at a time while another Inspektor does the routine job.
Viewing a Pin's Slices
Still not aware of a pin having slices at all, you are supposed to view them right away. Even if that comes a bit fast at the moment we have to touch this subject briefly. You will learn about slices in the next tutorial. For now just believe.
Between the two major columns of the Inspektor, namely the left one showing the pins values and the right one denoting their respective names is a third small, light gray column. In some places there is a little arrow (>) telling you that this pin potentially has multiple slices or even a double arrow (>>) telling you that this pin has multiple slices at the moment. No arrow at all indicates that this pin will always only have one slice. Clicking an arrow lets you view the individual values of all the slices. Click once more on the arrows to turn back to the previous view.
Also watch the video tutorial about Herr Inspektor.
Now rush on to the next tutorial Spread them Data, learn about slices and become a pro-patcher.
anonymous user login

Shoutbox
~17h ago
~7d ago
~7d ago
~8d ago
~21d ago
~1mth ago
~1mth ago
~1mth ago
~1mth ago
~1mth ago