Tutorial IOBoxes
French | Russian | Japanese | Italian | Korean | Mandarin
The following tutorial assumes that you have already worked through tutorial III: Spread them Data.
IOBoxes for each datatype
In the Hello World tutorial you have already made friends with the right double-click IOBox (Value Advanced) for the value datatype. But there are also IOBoxes for all the other datatypes:

In case you wonder, IO in IOBox stands for: Input/Output. Denoting that those nodes are useful for both purposes: As a means for the user to input data into the running program. On the other hand they can be used to output/display data from the running program.
Common features
Now try this: Select all the IOBoxes and move over the bottom or right edge of one of them until the cursor changes, indicating that you can size it now. Like sizing a window you click-drag to do so. All boxes are resized at once. Holding CTRL while dragging constrains sizing to one direction.

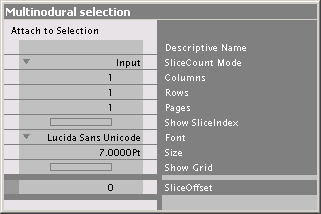
Apart from IOBox (Node) (which is a bit special) all IOBoxes share some common features. Select the four (except IOBox (Node) ) and have a look at the inspektor.

Here you can change the display font and font size. But of much more interest to us are the Columns, Rows and Pages pins. Say we want 3 rows. Oh. It seams as if the display makes place for 2 more entries/slices. But they don't show up yet. Because. SliceCount Mode is still set to Input. Meaning that the IOBox adapts to the slicecount it receives on its input. Since nothing is connected the IOBoxes slicecount defaults to 1.
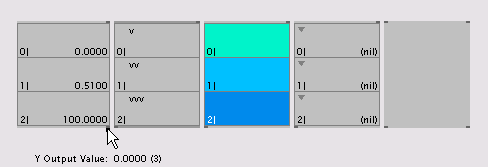
Change the SliceCount Mode to ColsRowsPages and note that 2 more slices appear which you can now edit individually. Hovering above the outputs of the IOBoxes assures you (by showing (3) at the end of the tooltip) that the IOBox now really delivers a spread of 3 slices on its output.
Now enable Show SliceIndex and Show Grid via the Inspektor and add some columns and pages.

You'll notice that columns and rows are visible, while the pages are not. Still, when hovering above the output of the IOBox the pages seem to have been taken into account: While an IOBox is in slicecount mode ColsRowsPages its slicecount is always Columns*Rows*Pages. To view the values on the other pages you can adjust the SliceOffset. The sliceindex displayed in every cell will help you orientate in the spread.
When using an IOBox to display spreads you can leave the SliceCount Mode at its default Input. Via the Columns and Rows pins you can now set the maximum number of slices you want to view.

The screenshot shows an IOBox (Color) receiving 100 slices of random color and displaying them in 4 columns of 25 rows each.
There are two video tutorials on creating IOBoxes], and entering some data] in them.
Sliders, Buttons, Lists,...
If you've been looking for interface elements like sliders and buttons the whole day, IOBoxes are also all that you want.

If, for example, you select only the IOBox (Value Advanced) and view it in the Inspektor you will see that it has some more configuration pins. Explaining all their meanings is beyond the scope of this little tutorial but you should find most answers to your questions in the HelpPatch of the IOBoxes.
But instead of playing around with sliders and buttons you should really concentrate on the important things in life and go on with Spread them Data II
anonymous user login
Shoutbox
~2d ago
~8d ago
~8d ago
~9d ago
~22d ago
~1mth ago
~1mth ago
~1mth ago
~1mth ago
~1mth ago

