Tutorial Effects - Multiple Textures
TOC: Of Effects and Shaders
Back: Neighbouring Pixels
Next: Multiple Passes
Textures and Samplers
As already mentioned in the chapter about texture coordinates a texture is always coming with a sampler. In fact a texture alone is not worth much in an effect and always needs to be wrapped by a sampler to be useable. The following lines of code are in our sample:
-
texture Tex <string uiname="Texture";>;
-
sampler Samp = sampler_state //sampler for doing the texture-lookup
-
{ -
Texture = (Tex); //apply a texture to the sampler
-
MipFilter = LINEAR; //sampler states
-
MinFilter = LINEAR;
-
MagFilter = LINEAR;
-
};
Here in line 2 a variable of type texture named Tex is specified. The annotation in angular brackets specifies that the corresponding texture pin on the effect node will show up as Texture. Next is the sampler block specifying a sampler named Samp that has the texture Tex associated with it as seen in line 5.
The rest are additional sampler states. For a listing of all possible samplerstates check Effect States (Direct3D 9).
Multiple Texture Pins
Texture pins on shaders cannot be spreaded in a way to get access to multiple slices of a texture pin within one pixelshader. If you need access to multiple textures in a pixelshader you need to specify multiple variables of type texture and respective samplers. So in fact you have to copy the code block depicted above for every additional texture you want to use and make sure to assign unique names to the texture and sampler variables and annotations and also assign each sampler its unique texture. As a restriction of hardware you can only have 16 texture inputs to an effect.
Fade between 2 textures
A typical examples of using multiple textures in a pixelshader would be to fade between 2. With the texture and samplers duplicated as described above the code that does tha actual texture blending could look something like this:
float Fade = 0.5;
float4 PS(vs2ps In): COLOR
{
    float4 colA = tex2D(SampA, In.TexCd);
    float4 colB = tex2D(SampB, In.TexCd);

    return lerp(colA, colB, Fade);
}
where the lerp() function does a linear interpolation exactly like so:
colB * Fade + colA * (1 - Fade)
Use a mask to blend between 2 textures
Another common case is that you have 2 textures and a mask that defines the blending between the two in form of a grayscale. For every pixel of the mask that is white you want to see the corresponding pixel of texture A, where the mask is black you want to see the corresponding pixel of texture B and where the mask has a gray value you want to see textures A and B blended together.

So you define a 3rd texture named Mask, assign it a sampler named SampMask and the pixelshader would look like this:
float4 PS(vs2ps In): COLOR
{
    float4 colA = tex2D(SampA, In.TexCd);
    float4 colB = tex2D(SampB, In.TexCd);
    float4 mask = tex2D(SampMask, In.TexCd);

    return lerp(colA, colB, mask.r);
}
Assuming the mask texture is a grayscale image, you can access any of its colorcomponents as a fading/blending value (the example uses the red component via .r). Note how you can also simply use the lerp() function, where now its third parameter can be a different value per pixel unlike before, where via the Fade parameter a constant, which was the same for the whole texture, was used.
Displace one texture by another
The section about texture coordinates already showed how you can programmatically modify the given texture coordinate before sampling a pixel in order to achieve various displacement effects.
Instead of generating the offsets in the pixelshader you can also interpret the color values of one texture as offsets to the coordinates of another. Like this you can create the offset texture more intuitively via patching. Here is how to achieve a horizontal glitch effect on your texture:

float4 PS(vs2ps In): COLOR
{
    float4 offset = tex2D(SampOff, In.TexCd) - 0.5;
    float4 col = tex2D(SampA, float2(In.TexCd.x + offset.r, In.TexCd.y));
    return col;
}
For this example you create a new texture input and assign it to a sampler called SampOff. As the code shows this offset sampler is sampled first and then (assuming our desired offset is encoded in the red component of the offset texture) the offset.r value (which as we know is between 0 and 1 is used as an offset to the x component of the incoming texture coordinate. The -0.5 is for centering the offset value that is between 0 and 1 around 0 to get an offset in both positive and negative x.
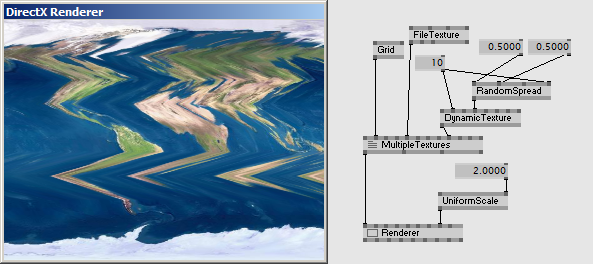
In the patch a DynamicTexture (EX9.Texture Value) is used with its Width set to 1 and Height set to correspond to the texture we want the glitch to operate on. This ensures the effect actually operates linewise. Attaching a spread of random values to the Red of the DynamicTexture (EX9.Texture Value) you can now intuitively set the linewise offsets.
Texture Filtering
Now say you don't want to have the effect so fine, but only define 10 offsets. Set the DynamicTexture (EX9.Texture Value) Height to 10 and also only fill it with 10 random values. The result looks strange:

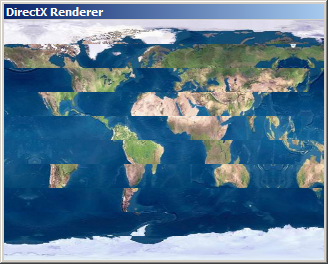
What happens here is that the offset texture, now only 10 pixels in height, is still being sampled 512 times (the height of the other texture input to the effect). For sampling 10 values 512 times some interpolation/resampling algorithm has to be applied in order to decide which of the 10 values is sampled corresponding to each of the 512 pixels of the other texture. And this algorithm can be set using the samplers MagFilter state. Set it to POINT and spot the difference.
texture Off <string uiname="Offset Texture";>;
sampler SampOff = sampler_state    //sampler for doing the texture-lookup
{
    Texture   = (Off);          //apply a texture to the sampler
    MipFilter = LINEAR;         //sampler states
    MinFilter = LINEAR;
    MagFilter = POINT;
};

Next: Multiple Passes
Back: Neighbouring Pixels
TOC: Of Effects and Shaders
anonymous user login
Shoutbox
~6d ago
~6d ago
~7d ago
~20d ago
~1mth ago
~1mth ago
~1mth ago
~1mth ago
~1mth ago
~1mth ago

