
Tutorial Effects - Neighbouring Pixels
TOC: Of Effects and Shaders
Back: Texture Coordinates
Next: Multiple Textures
There is a series of image processing filters that are based on the idea that from the point of view of one pixel in the image you take its neighbouring pixels (left, top, right, bottom and possibly the diagonal neighbours as well) into account when deciding on the color of the current pixel.
The key problem to solve in applying such filters in pixelshaders is how you'd access a pixels neighbours when for a start all you have is the current pixels texture coordinate. From within the pixelshaders function you cannot simply access its left neighbouring pixel. You'd first have to figure out its texture coordinate to sample it correctly.
Given a textures original size (WIDTH/HEIGHT) you can compute the distance between two pixels in texture space units. The math is simple: If texture coordinate 0 specifies pixel 0 and texture coordinate 1 specifies pixel WIDTH the distance from one pixels coordinate to its horizontal neighbours can be expressed as 1 / WIDTH. So while in pixel units a pixels size is of course 1x1 in texture space units a pixels size can be thought of as:
float2 pixelSize = 1 / float2(WIDTH/HEIGHT)
Using pixelSize.xy you can then access neighbouring pixels by adding/subtracting that value to/from a pixels coordinate. You best do this calculation in the patch and hand the result over to the pixelshader via a
float2 PixelSize; //where .x will be the width and .y will be the height of pixels
Edge Detection
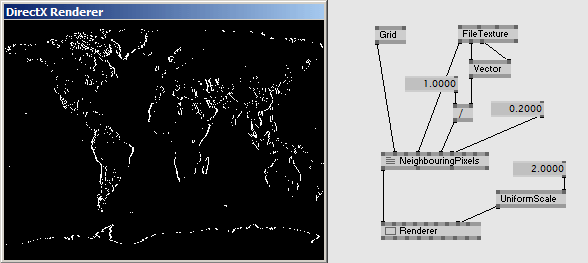
A simple example of an application is an edge detection filter where for every pixel we take its left and right neighbours, computing their difference and check if the results absolut value is greater than a given threshold. If it is, the pixel is colored white, else black.
float2 PixelSize;
float Threshold = 0.2;
float4 PS(vs2ps In): COLOR
{
    //the texture coordinate offset with vertical coordinate set to 0
    float2 off = float2(PixelSize.x, 0);

    //sample the left and the right neighbouring pixels
    float4 left = tex2D(Samp, In.TexCd - off);
    float4 right = tex2D(Samp, In.TexCd + off);

    if (abs(ConvertToGray(left).x - ConvertToGray(right).x) > Threshold)
      return 1;
    else
      return float4(0, 0, 0, 1);
}
There are two things to point out in the above code:
- The variable named off is just a temporary variable we define to use in lines 39 and 40 to first subtract it from the current texture coordinate to address the left neighbouring pixel, then add it to the current texture coordinate to address the right pixel.
- The usage of the .x swizzles in line 42: since the ConvertToGray function returns a float4 but for the further calculation we only need a single brightness value we can at this stage access only the first component of the float4 to compare the lightness of the two neighbouring pixels.
To improve the edge detection we have to do it in both directions. So in addition to the left and right pixels we also have to sample the upper and lower pixels:
//the texture coordinate offset with horizonal coordinate set to 0
off = float2(0, PixelSize.y);
//sample the upper and the lower neighbouring pixels
float4 upper = tex2D(Samp, In.TexCd - off);
float4 lower = tex2D(Samp, In.TexCd + off);
and then we have to take those into account together with the left and right pixels when deciding about the return color:
if (abs(ConvertToGray(left) - ConvertToGray(right)).x > Threshold
||
abs(ConvertToGray(upper) - ConvertToGray(lower)).x > Threshold)
    ...
where the || is in hlsl-speak a boolean OR meaning that we color the pixel white if either the difference between the left and right pixels exceeds the threshold OR the difference between the upper and lower pixels.
Blur
Also a blur can be realized this way. The better the blur is supposed to be, the more neighbouring pixels it has to take into account. Since the number of texture samples per pixel are limited to 16 a good blur is best achieved by doing it in two passes. First horizontally, then take the resulting image and do the blur again in vertical direction. So for now lets concentrate on a horizontal blur.
The idea is to sample a range of neighbouring pixels and add up their colors while weighing their influence corresponding to their distance from the current pixel. The current pixel gets the most weight, while the 2 left- and rightmost pixels are taken into account only with a smaller weight. The result then has to be normalized back to the range of 0..1 by dividing through the sum of all weights.
float2 PixelSize;
float4 PSHorizontalBlur(vs2ps In): COLOR
{
    float4 sum = 0;
    int weightSum = 0;
    //the weights of the neighbouring pixels
    int weights[15] = {1, 2, 3, 4, 5, 6, 7, 8, 7, 6, 5, 4, 3, 2, 1};
    //we are taking 15 samples
    for (int i = 0; i < 15; i++)
    {
        //7 to the left, self and 7 to the right
        float2 cord = float2(In.TexCd.x + PixelSize.x * (i-7), In.TexCd.y);
        //the samples are weighed according to their relation to the current pixel
        sum += tex2D(Samp, cord) * weights[i];
        //while going through the loop we are summing up the weights
        weightSum += weights[i];
    }
    sum /= weightSum;
    return float4(sum.rgb, 1);
}
To realize a vertical version of this pixelshader you'd now duplicate the PS() function, name it PSVerticalBlur() and change the code so that it computes a vertical blur, like so:
float4 PSVerticalBlur(vs2ps In): COLOR
{
    ...
        //7 upwards, self and 7 downwards
        float2 cord = float2(In.TexCd.x, In.TexCd.y + PixelSize.y * (i-7));
    ...
}
Now that you have two pixelshader functions in the effect you also need two techniques:
technique THorizontalBlur
{
    pass P0
    {
        PixelShader  = compile ps_2_0 PSHorizontalBlur();
    }
}

technique TVerticalBlur
{
    pass P0
    {
        PixelShader  = compile ps_2_0 PSVerticalBlur();
    }
}
Like this you can use the two techniques alternatively but as mentioned before a better quality blur would be achieved if you'd apply the result of the first (horizontal) blur-pass as input to the second (vertical) pass... More on multipass effects comes after the next chapter.
Those were the basics of pixel-neighbour based image processing. But there is actually a whole range of similar effects which are commonly referred to as convolution/kernel filters. With things learned so far you should be able to progress in this direction on your own. See here and there for details and examples.
Next: Multiple Textures
Back: Texture Coordinates
TOC: Of Effects and Shaders
anonymous user login

Shoutbox
~2d ago
~9d ago
~9d ago
~9d ago
~23d ago
~1mth ago
~1mth ago
~1mth ago
~1mth ago
~2mth ago