Tutoria de asignación de datos
English | French | Russian | Japanese | Italian | Korean | Mandarin
El siguiente tutorial supone que ya ha visto el tutorial II: Inspector.
Asignación de Datos
Si un día usted decide tomar el reto y participar en el examen final es mejor estar seguro de haber comprendido la facilidad de las listas que asignan datos a las propiedades de cada nodo. Siga leyendo con cuidado y le va a encantar. Porque:
Una lista de divisiones
Primero que todo. La palabra Spread actualmente denota nada más que una "lista". Una lista de datos arbitrarios. Éstos datos pueden ser valores, cadenas, colores,... y cada una de las entradas presentes en dicha lista la llamamos Slice.
Ya es consciente de que cada pin de los nodos constituye un tipo de dato en vvvv (por ejemplo. valor, cadena, color, enumeración, nodo). Lo que no ha sido mencionado hasta ahora es que cada pin no necesariamente tiene una sola instancia de datos, sino que potencialmente puede llevar a una lista mayor de los datos.
Spread generators
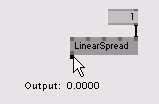
You can find out the number of slices a pin has by hovering above it with the mouse. Create a LinearSpread (Spreads) and hover above its output pin. Nothing special. Right. Now set the nodes SpreadCount to 5. Hover the pin again and note the (5) behind the value.


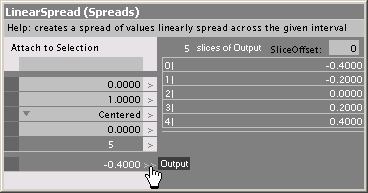
So the tooltip wants to make you believe that there are 5 slices but only shows you one. Be glad. Suppose you don't have only 5 but say 9874 slices. You wouldn't want to view them all in a tooltip. But of course there are other ways of viewing all the slices of a spread. Remember it from the last tutorial? When viewing a node in the Inspektor you can click the little arrows left to a pins name to get a view on the whole spread.

Like the LinearSpread (Spreads) node there are several more nodes that can generate spreads. If you are curious just quickly go over the helppatches of CircularSpread (Spreads), RandomSpread (Spreads) and I (Spreads).
Making use of Spreads
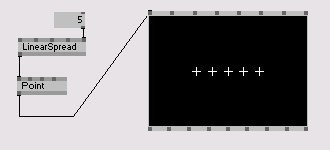
Think further. There is a pin carrying a spread of 5 slices. How does a node deal with that spread if it is connected to one of its inputs. To see what happens you need to create Renderer (GDI) and a Point (GDI) that you connect to the renderer. This results in one + painted in the middle (i.e. at the coordinates given through the X and Y inputs at the Point (GDI) ) of the Renderer (GDI). Now Connect the LinearSpread (Spreads) output to the X input of the Point (GDI) and lean back.

What you see is the clever Point (GDI) node handling a spread. It simply paints its + not only once but 5 times since it got a list of 5 coordinates where to paint. Obvious, eh? If you were a point what'd you do? Yeah, but what if you get connected a spread with a different count on another pin. Duplicate the LinearSpread (Spreads) set its SpreadCount to 2 and connect it to the Y input of the Point (GDI) to see its reaction.

Get that? The Point (GDI) receives 5 values on the X input and 2 values on the Y input. What it does:
- when painting the first + it takes the first slice of the X pin and the first slice of the Y pin
- when painting the second + it takes the second slice of the X pin and the second slice of the Y pin
- when painting the third + it takes the third slice of the X pin and since there is no third slice on the Y pin it simply take the first slice again
- ...
That's it. That is the way every node deals with spreads from its inputs. If the input understands spreads. If it doesn't all slices but the first will be discarded. To find out if a pin understands spreads watch it in the Inspektor. A > or >> left to its name indicates that it does understand spreads.
It can never hurt to watch the video tutorial about spreads.
Accessing individual Slices
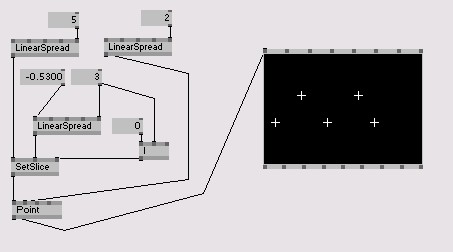
If you do it right, in most cases you'll not need to deal with individual slices, since almost every node can deal with spreads natively. But of course there are good reasons to access individual slices. Suppose we have such a reason and want to manipulate the 3rd slice that comes out of our first LinearSpread (Spreads) manually. Therefore we insert a SetSlice (Spreads) node as shown below.

The rightmost input of SetSlice (Spreads) tells the node which slice we want to modify. Since slices are counted from 0, if we want to change the 3rd slice we have to enter 2 here. The 2nd input is the new value for that slice. Manipulate that value and note the 3rd + moving independently from the others.
That's quite nice you may say. But have a look at this:

Via the I (Spreads) node we tell the SetSlice (Spreads) that we do not only want to manipulate the 3rd slice but all slices from the first to the third. And with another LinearSpread (Spreads) we create those 3 values...
And so on. Thus, whenever you think things won't work out a spread will come handy.
Further experimenting
At this point you may also want to have a look at the helppatches of: GetSlice (Spreads), Stallone (Spreads), Queue (Spreads) and Cons (Spreads).
The tutorial series now goes on telling you some things you should know about IOBoxes
anonymous user login
Shoutbox
~4d ago
~10d ago
~10d ago
~11d ago
~24d ago
~1mth ago
~1mth ago
~1mth ago
~1mth ago
~2mth ago

