cn.Tutorial Effects - Texture Coordinates
TOC: Of Effects and Shaders
Back: Manipulating Colors?
Next: Neighbouring Pixels
正如我们前面看到的,材质的现实里面含有材质坐标:
float4 col = tex2D(Samp, In.TexCd);
上面tex2D 函数带有两个参数:一个取样器和一个包含2维坐标的两位浮点数,取样器就就是在这个坐标中进行取样。材质的坐标范围从左上角(0,0)到右下角(1,1)。这两个向量元素不用x、y表示而通常用u、v表示。详情请见:msdn about Texture Coordinates。
If we leave the In.TexCd parameter as is we are using the unchanged texture coordinates for every pixel drawn as they are being provided by the vertex-shader. 每个顶点都会提供一个材质坐标,同时显卡会为网格中的每个像素在给出的每个顶点材质坐标之间进行插值。
材质坐标可视化
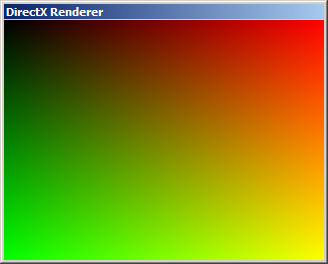
只是为了理解一下材质坐标让我们看见它们。因为它们值的范围是0到1之间像4元素中每个独立的颜色元素一样,在像素着色函数中我们可以这样来写:
return float4(In.TexCd, 0, 1);
u元素坐标显示为红色,v元素坐标显示为绿色。

偏移x坐标
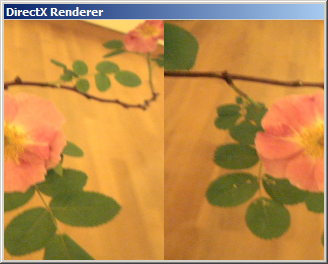
那么让我们看会发生什么情况如果我们在使用之前在tex2D函数中修改一下坐标:
float2 cord = In.TexCd;
cord.x += 0.5;
return tex2D(Samp, cord);

这里对于每个像素材质坐标的x(i.e. u)元素偏移0.5,这样得到的结果是在网格上材质偏移它尺寸的一半。你看到材质坐标大于1的地方(例如在这个案例中1到1.5),材质按照镜像的效果显示。
取样器状态
这是取样器进入游戏的方式。如果你滚动到effect代码的顶端你可以看到下面几行代码,它定义取样器:
-
sampler Samp = sampler_state //sampler for doing the texture-lookup
-
{ -
Texture = (Tex); //apply a texture to the sampler
-
MipFilter = LINEAR; //sampler states
-
MinFilter = LINEAR;
-
MagFilter = LINEAR;
-
};
这个取样器定义了材质材质是怎样被取样的。这里filters定义两个像素之间的插值模式,address状态定义了材质坐标超出0和1之外的插值方式。试一下下面案例中的代码:
-
sampler Samp = sampler_state //sampler for doing the texture-lookup
-
{ -
Texture = (Tex); //apply a texture to the sampler
-
MipFilter = LINEAR; //sampler states
-
MinFilter = LINEAR;
-
MagFilter = LINEAR;
-
AddressU = WRAP;
-
};

保存后看一下材质现在不是镜像而是包裹(wrapped)。所有可能的取样状态的列表请查阅Effect States (Direct3D 9)
材质波纹
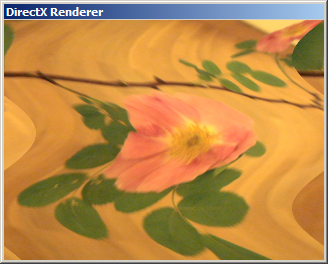
在上面的例子中我用同样的量偏移了每一个像素中的x坐标。这里是一个例子,根据y坐标的值偏移x坐标来完成一个波纹效果:
float Frequency = 10;
float Phase = 0;
float Amplitude = 0.1;
float4 PS(vs2ps In): COLOR
{
    float2 cord = In.TexCd;
    cord.x += sin(cord.y * Frequency + Phase) * Amplitude;
    float4 col = tex2D(Samp, cord);
    return col;
}

尝试 LFO (Animation输出与2Pi相乘(使用PI (Value)节点输入到Phase引脚上。我们会看到很流畅的波纹动画。这里需要2 Pi因为sin() 函数需要弧度表示的角度参数它的值的范围从0到2 Pi。为了映射LFO节点输出到的那个范围,我们只需要简单的乘以2 Pi即可。
函数打印
或者把材质坐标看成一个2维的场域你能够绘制一个数学的函数,而不用输入任何材质:
int Frequency = 50;
float Phase = 0;
float Amplitude = 1;
float4 PS(vs2ps In): COLOR
{
    float2 cord = In.TexCd - 0.5;
    float dist = sqrt(pow(cord.x, 2) + pow(cord.y, 2));
    float4 col = sin(dist * Frequency + Phase) * Amplitude;
    col.a = 1;  //make sure the alpha component is 1
    return col;
}

这里每一个像素的到中心的距离都被计算作为sine函数的输入。
Si claro so far?
Next: Neighbouring Pixels
Back: Manipulating Colors
TOC: Of Effects and Shaders
anonymous user login
Shoutbox
~5h ago
~7d ago
~7d ago
~7d ago
~21d ago
~1mth ago
~1mth ago
~1mth ago
~1mth ago
~1mth ago

