cn.Tutorial Effects - Multiple Passes
TOC: Of Effects and Shaders
Back: Multiple Textures
Next: Vertexshader Preparations
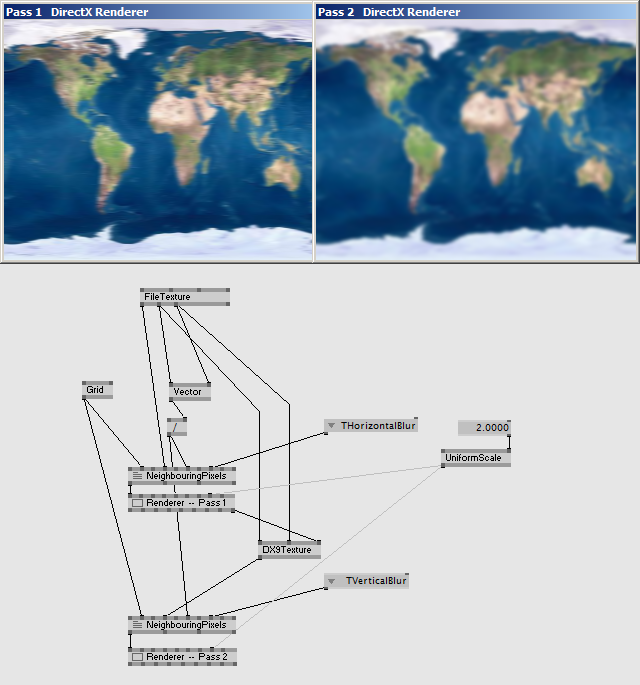
正如在EX9.Effect.File中描述的那样,effects能够在每个technique中有多个通道,但(在vvvv中)通道2没有办法收到在像素着色的通道1中返回的颜色值。对于这种多通道的effects我们需要通过Renderer (EX9)绕一圈,通过DXTexture (EX9.Texture)使用它的输出作为材质,在输入到另外一个effect中。
效果链
正如在Neighbouring Pixels我说过的下面是是如何连接垂直和水平模糊的方法,从在两个方向上而达到很平滑的模糊。

渲染“通道1”的输出被用做一个材质,它的分辨率对应原图的大小。这个材质被用作垂直模糊效果“通道2”中,像这样你可以链接起很多的效果。
反馈
当然使用这个技术你也能够创建效果,把输出的结果通过一个材质在输入,由此创建一个回馈。
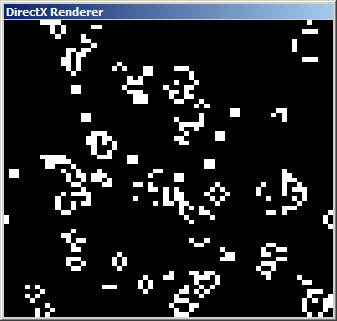
这样应用的一个例子如下Cellular Automata 最广泛流行的一个例子是John Horton Conway's "Game of Life".

Rather than a game it is actually more a simulation based on a grid of cells (much like pixels of a texture) that can either be dead (black) or alive (white). The simulations result is essentially a black texture with some white pixels. Using the result as a starting point for the next generation of the simulation creats a feedback and lets the simulation run forever. Of course this needs an initial state to start from which is realized in this example using the mouse to add living cells, see the according patch in of-effects-and-shaders除了是一个游戏他实际上更多的是一个模拟的细胞网格(很像材质中的像素)既可以死(黑色)也可以生(白色)。这个模拟的结果根本上是一个黑色的材质上有很多白色的像素。使用这个结果作为下一代模拟的开始点创建一个反馈从而让这个模拟永远循环。当然这需要一个初始状态以此为开始实现,在下面这个例子中使用鼠标去添加活着的细胞,在of-effects-and-shaders中看相应的例子。
“生命游戏”有三个简单的原则:
- 当前细胞为死亡状态时,当周围有3个存活细胞时,该细胞变成存活状态。 (模拟繁殖)
- 当前细胞为存活状态时,当周围有2个或3个存活细胞时, 该细胞保持原样。
- 所有其它的状况,一个细胞死亡或保持死亡的状态(模拟人口稀少或模拟过度拥挤)。
因此在像素着色中对于每一个像素我们可以计算它周围活着的细胞,根据这个规则决定它在下一步是生还是死。
float2 PixelSize;
float4 PS(vs2ps In): COLOR
{
    //sample the current pixel
    float4 center = tex2D(Samp, In.TexCd);

    //prepare pixel offsets for x and y
    float2 offX = float2 (PixelSize.x, 0);
    float2 offY = float2 (0, PixelSize.y);

    //sample neighbours and add up their states
    float alive = 0;
    alive += tex2D(Samp, In.TexCd - offY).r;
    alive += tex2D(Samp, In.TexCd - offY - offX).r;
    alive += tex2D(Samp, In.TexCd - offY + offX).r;
    alive += tex2D(Samp, In.TexCd + offY).r;
    alive += tex2D(Samp, In.TexCd + offY - offX).r;
    alive += tex2D(Samp, In.TexCd + offY + offX).r;
    alive += tex2D(Samp, In.TexCd - offX).r;
    alive += tex2D(Samp, In.TexCd + offX).r;

    //a dead cell with exactly three live neighbors becomes a live cell (birth).
    if (center.r == 0 && alive == 3)
    {
      center.rgb = 1;
    }
    //a live cell with two or three live neighbors stays alive (survival).
    else if (center.r == 1 && (alive == 3 || alive == 2))
    {
      center.rgb = 1;
    }
    //in all other cases, a cell dies or remains dead (overcrowding or loneliness).
    else
    {
      center.rgb = 0;
    }

    return center;
}
在effect中另一个要注意的重要事情是取样状态的设置:
sampler Samp = sampler_state    //sampler for doing the texture-lookup
{
    Texture   = (Tex);          //apply a texture to the sampler
    MipFilter = NONE;         //sampler states
    MinFilter = POINT;
    MagFilter = POINT;
};
注意怎样让所有的过滤器失效。这能保证真正的只对每个单独的像素起作用,不让图形显卡自动的在像素间插值,在这个程序中这是没有意义的,因为这里每个像素只能是黑色或白色,没有灰色的着色。
Next: Vertexshader Preparations
Back: Multiple Textures
TOC: Of Effects and Shaders
anonymous user login
Shoutbox
~3d ago
~9d ago
~9d ago
~10d ago
~23d ago
~1mth ago
~1mth ago
~1mth ago
~1mth ago
~2mth ago

