
How To Project On 3D Geometry
- Projecting on 3D Geometry
- Texturing real Architecture via Projections
- Projection/Video Mapping
- Undistoring Projections
- Augmented Reality
- Camera Matching/Resectioning/Calibration
- Pose Estimation
Note that due to the manual nature of the described approach your results will not be perfect, but can be quite good depending on your patience.
- Introduction
- Projection on a flat surface
- Projection on an arbitrary surface
Introduction
All the above mentioned topics deal with the same problem: Find the pose (position, orientation) of an object or the pose and lens characteristics (field of view, shift) of a camera viewing that object.
In cinematography with 3d visual effects the terms "match moving" or "camera tracking" are used to describe the problem of matching a real world scene with its virtual counterpart in order to mix them together seamlessly. For this task a list of software exists (boujou, 3d equalizer, ...) that makes the live of visual effects people easier.
For realtime computergraphics the ARToolKit provides a way that works for certain situations (see ARTK+Tracker? for a vvvv implementation) and companies like domeprojection offer projector autocalibration services. But as long as vvvv doesn't have nodes to patch something like this or even this the manual approach for static matching can still help to solve certain problems.
Projection on a flat surface
If your projection target is a flat surface, like a wall and your projector is at an arbitraty position, not exactly facing the part of the wall you want to project to, the projected image looks distorted. Using Homography (Transform 2d) you can easily pre-distort the image you project so that it appears undistorted on the surface.
Note: Like this you can always get a correctly looking projected image on a flat surface independent of the projectors position, orientation to the surface and its lens characteristics.
Projection on an arbitrary surface
Manually matching a static virtual projector with a real projector
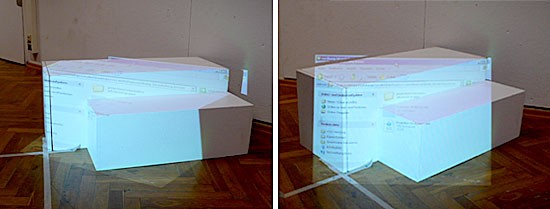
When projecting onto an arbitratry 3d surface, no matter how the projector is positioned and oriented towards the surface the resulting image will mostly look distorted. Note though that there is one point from which the projected image looks perfectly aligned, that is: the position of the projector.
The photos below show a simple sculpture of 2 boxes with a windows-desktop projected flat on it. While in the left photo the projected image is distorted, in the right photo, taken from the projectors point of view, the projected image looks correctly.
Having seen the above you should now understand that the key to a correctly undistorted projection is the following:
Also compare Distorted way-finding-system and 3D Painted Rooms.
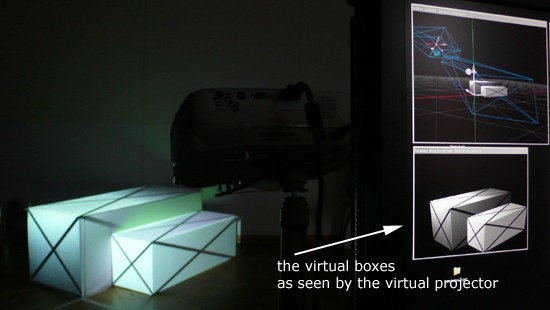
So in order to achieve an undistorted look on an arbitrary surface you simply have to provide the projector with an image that depicts a view onto that surface from its own (the projectors) position. Or in other words: consider the real projector being a camera in virtual space, viewing a virtual replica of the real projection surface. If you project the image this virtual camera sees with the real projector, it would fit exactly and look undistorted on the real surface.
Note that this works perfectly only in theory, as chances are that your virtual scenes parameters will never exactly match your real world parameters, as some of them, like the projectors orientation, are hard to measure precisely. But never mind, there begins the manual tweaking of those parameters and with some patience and practice you'll get quite good results.
Virtual replica of the real scene
Creating a virtual copy of your real world setup includes three steps:
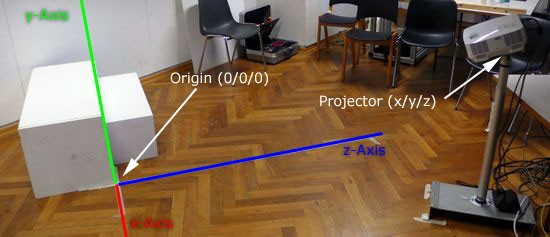
- define the origin for your real worlds coordinate system which you will match with your AxisAndGrid (DX9) within vvvv.
- create the target projection surface as a 3d model and place it correctly in your virtual scene regarding the coordinate systems origin: you can do this using an external 3d modelling tool or using vvvvs geometric primitivs. Anyway its best to have a mesh which you can finetune manually using PointEditor (3D Persistent) during the matching process.
- measure the position, orientation and lens-characteristics of the projector: use the Projector (EX9) module and specify all parameters this node offers. Look for sketches like the following in the projectors manual that provide you with the information for lens-shift and field of view of the lens.

At this point you have a basic setup where the virtual scene matches the real world. Take your time to fiddle with the parameters of the Projector (EX9) module or slightly adapt your mesh using the PointEditor (3D Persistent) module until you are satisfied with the overlapping of your virtual and real world scene.
ProjectionMapping_SimpleSetup.v4p (27.74 Kb)]
Flat textures aligned to the surface
With this basic setup it is now simple to achieve an effect like in dotdotdot's Valcucine’s skyscraper project. Here it is the goal to project images in a way that they feel like a property of the target surface, ie. like they where a texture of the object. The textures should look exactly the same, from whatever position you view the surface/sculpture and certainly independent of the projectors position.
By rendering the 3d model from the same viewpoint and using the same lens-characteristics as the real projector has for the virtual camera, the resulting image will perfectly fit the projected surface. Any flat textures you give the 3d model (in the above example a simple black cross on white) will look undistorted on the real surface and therefore look and behave naturally like flat textures that look the same independent of the spectators point of view.
Lights and Shadows
Any shading (including lighting and shadowing) you apply to the virtual model is a surface oriented effect and as such behaves like a flat texture on the model. Effects like seen in our own Lightstrive and Pablo Valbuena's Augmented Sculpture Series can be realized just like this.
3d illusion
Fake 3d effects like seen in Pablo Valbuena's The Hague City Hall projection, AntiVJs Nuit Blanche Bruxelles projection and some of easyweb's projections contain an additional quirk you should be aware of.
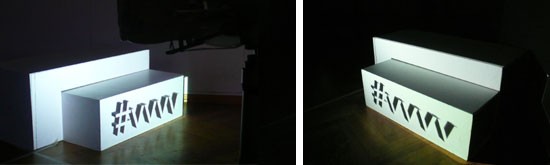
While with the above setup those effects are quite easy to achieve, by simply adding 3d extensions to your virtual model, for a spectator they really only work from the one point in real world that corresponds to the virtual cameras position. Like this simple example shows, when viewed from about the projectors perspective the text seems to be extruded from the little box. When viewing the same projection from a completely different point, the illusion is gone.
But never mind, in many cases this isn't a big deal as our TV/cinema trained eyes and brains are quite tolerant with such visual challenges as long as our viewing position isn't too far off the actual position. Also compare John Beever's Pavement Drawings.
Virtual Camera's perspective is different to real world projector position
With some setups it is just not possible to have the real projector's position match the virtual camera's/projector's position:
- You may want the virtual scene to be viewed from a position where you cannot place the projector in real world
- You may want several real world projectors to share one virtual perspective.
In those situations you need 2 render-passes:
- the first pass renders the scene from the desired perspective
- the second pass renders the scene from the desired real world position of the projectors WHILE the result of the first pass is being projected onto the 3d models surface from the perspective of the virtual camera.
Examples:
Projecting on two sides of a house with one perspective
In this setup the idea was to project (among others) 3d-illusion effects onto the facade of the FH Schwäbisch Gmünd.
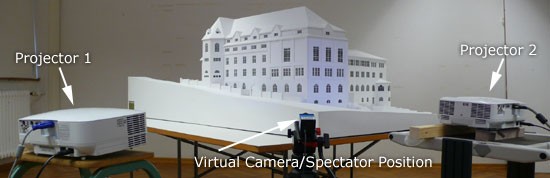
Knowing that those effects only work from one perspective a spectators view was chosen from which both sides of the facade can be seen. That is in the middle of the two real projectors to be used.
Here is a patch that demonstrates the basic setup:
ProjectionMapping_2ProjectorSetup.zip (12.11 Kb)]

The above picture demonstrates that the 3d-illusion only works from the specified virtual camera/spectator position. For more results of the 5 days workshop in Schwäbisch Gmünd see here.
360° projection setup
In a 360° projection the virtual cameras all need to be placed in the same position, with only different rotations. While this is possible in a virtual scene you cannot put several physical projectors at exactly the same place in the real world.
For an extensive demo of a 360° projection setup, including soft-edging, see:
small 360 degree setup.zip (35.95 Kb)]
anonymous user login

Shoutbox
~6d ago
~6d ago
~7d ago
~20d ago
~1mth ago
~1mth ago
~1mth ago
~1mth ago
~1mth ago
~1mth ago