
Tutorial Geometry Morphing GPU1
French | Russian | Italian | Japanese
the simple gpu based approach
preparing the morphtargets
as the title of this topic implies this approach is based on a shader/effect. we are going to play with the geometry data (i.e. vertices) of meshes and thus will write a simple so called vertex-shader. whenever starting to write an effect in vvvv it is good to start with the Template (EX9.Effect) node. due to the lack of cool morphable models included with vvvv we will again use two dumb cylinders to morph between. prepare a patch that looks something like this:
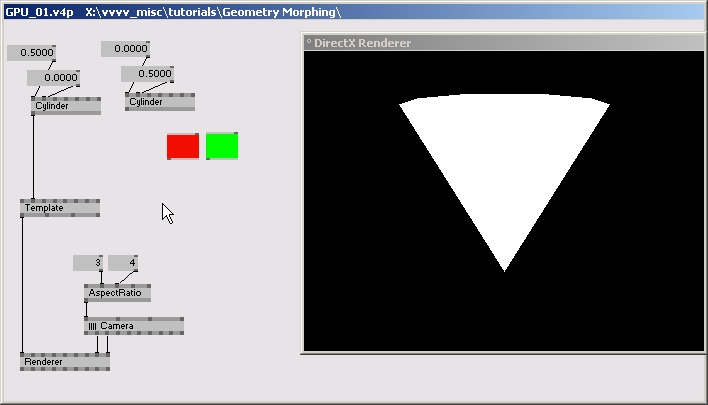
again note that the AspectRatio/Camera combo is not essential here but only good patching style. the template effect is really basic that is why we see nothing but a white cylinder.
stuffing two meshes in one
we were promised that all the costly magic will happen within the effect so that performancewise this approach would outperform the other by far. so how then will we get the two (or even more) meshes connected to the effect? that is what this is all about actually. but the thing is you will never get more then one mesh connected to an effect. you have to trick the effect by building your own mesh containing the geometry data of both (all) your morph targets.
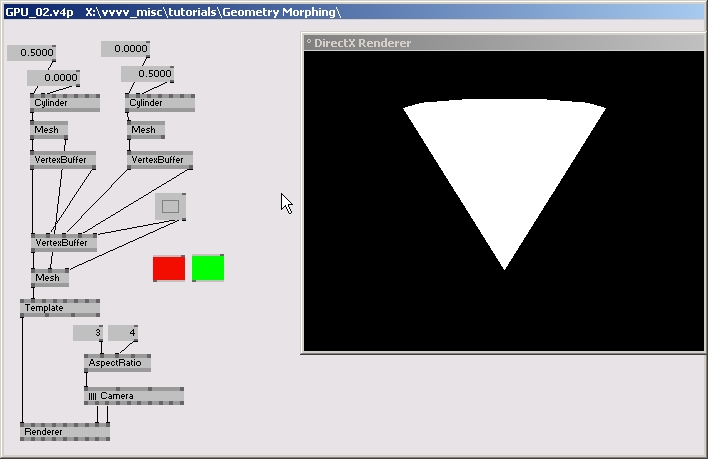
the patch above shows how to stuff the position and normals components of two meshes into one. pay special attention to the VertexBuffer (EX9.Geometry Join) node. you have to select it in an inspektor to unlock some additional pins: while a vertexbuffer can only hold one component named "position" and one component named "normal" it can hold several (up to 8) components labeled "texture coordinate". those are free to use for our purpose. via inspector we create 2 additional pins on VertexBuffer (EX9.Geometry Join) by selecting "3D TexCoords" as value for the first two "Enable Texture Coordinate .." pins. now we can also feed positions and normals of our second morphtarget into the vertexbuffer.
that we feed position/normal data into vertexbuffer components labeled "3D TexCoords" doesn't matter. only later when writing the vertexshader we have to remember that to be able to read out the correct data from the incoming vertexbuffer. in an effect the above mentioned "labels" or "names" are called "semantics". but more on those below..
the vertex shader
the rest of the magic will happen within the effects vertexshader. open the Template (EX9.Effect) with a rightclick and click on the TFixedFunction in the left panel. since there will be no fixedfunction version of our morphing effect we can delete this technique (i.e. all lines below: technique TFixedFunction...) and save (STRG+Shift+S) the template to our own name (e.g. MyFirstMorph.fx).
first we will need a "MorphFactor" pin on the effect and two color pins. we create them by adding the lines:
float MorphFactor;
float4 Color1: COLOR;
float4 Color2: COLOR;
just beneath the exisiting lines (on top of the effect):
//transforms
float4x4 tW: WORLD;        //the models world matrix
float4x4 tV: VIEW;         //view matrix as set via Renderer (EX9)
float4x4 tP: PROJECTION;
float4x4 tWVP: WORLDVIEWPROJECTION;

float MorphFactor;
float4 Color1: COLOR;
float4 Color2: COLOR;
notice how our effect in the patch got 3 new pins after adding those lines.
now locate the lines
vs2ps VS(
   float4 PosO  : POSITION,
   float4 TexCd : TEXCOORD0)
{
...
in the effect. they connote the actual vertex shader function. the following line:
Out.Pos = mul(PosO, tWVP);
is the interesting one. here it says that the incoming position data of the first cylinder (PosO) is to be transformed by the worldviewprojection matrix (tWVP) and put out as the result of the effect (Out.Pos). here is where we chime in and mix the incoming position of the first cylinder with the incomming position of the second cylinder.
how would you know that the incomming variable PosO denotes the position data of the first cylinder? because. the variable is marked with the POSITION semantic. so if we want to access the position of our second morphtarget which we fed into the vertexbuffer as "TexCoord0" we can do so by declaring a variable and assigning it the TEXCOORD0 semantic. which has already been prepared for us.
float4 TexCd : TEXCOORD0;
since we don't need the texture coordinates in our sample we can just rename this variable to "PosO2".
float4 PosO2: TEXCOORD0;
now we have access to both morphtargets and can do the morphing. either somewhat complicated (but readable) by replacing the line:
Out.Pos = mul(PosO, tWVP);
with:
Out.Pos = mul(MorphFactor * PosO + (1-MorphFactor) * PosO2, tWVP);
or simply make use of the hlsl intrinsic function "lerp" that does exactly the above:
Out.Pos = mul(lerp(PosO, PosO2, MorphFactor), tWVP);
now you should get an error mentioning the "TexCd" variable we replaced with the "PosO2" a second ago. just delete the line:
Out.TexCd = mul(TexCd, tTex);
now the effect should compile and when you change the value of the "MorphFactor" pin in the patch you should already see what you just achieved.
still we are missing the morphing colors. but that is just as easy. locate the template pixelshader function:
float4 PS(vs2ps In): COLOR
{
   float4 col = tex2D(Samp, In.TexCd);
   return col;
}
and replace it with:
float4 PS(vs2ps In): COLOR
{
   return lerp(Color1, Color2, MorphFactor);
}
there we are.

bonus
now you may want to see not only flat shaded models being morphed. just take a GouraudDirectional (EX9.Effect) save it under a different name and apply the same changes we did for the Template (EX9.Effect). note that now besides the position data you'll also have to morph the normals!
anonymous user login

Shoutbox
~4h ago
~7d ago
~7d ago
~7d ago
~21d ago
~1mth ago
~1mth ago
~1mth ago
~1mth ago
~1mth ago