SkinningWithSkeletonNodes
- Some skinning theory
- Building some character
- Skin it
- Deform it
- The inverse bind pose transformation
- A word on software skinning
This tutorial shows an example of how to build and skin a kind of abstract character model based on a skeleton dynamically. I uploaded an extended version of the patch described below, which also shows some parts from a previous tutorial. You can download it here: walkingboxes.rar.</p>
Some skinning theory
Skinning describes the process of binding a 3D geometry to a skeleton. The skeleton acts as some kind of abstraction layer over the 3D geometry: instead of moving single vertices, the animator can move joints - the 3D vertices are moved accordingly.
Besides X,Y,Z coordinates, every 3D vertex can have further data assigned, e.g. bind indices and skin weights. Those measures describe, to which extent a vertex is influenced by a certain joint. The bind index is the index of the influencing joint, and theskin weightis the amount of influence, the joint has on a vertex.
If each vertex of a model is influenced by only one joint to full extent, we call this rigid skinning. If multiple joints influence one vertex, we speak of soft skinning or smooth skinning. As you might have guessed, the results here are softer. And smoother, as well. If you are working with vertex buffers and hardware skinning, the number of influencing joints per vertex is limited to 4.
Building some character
We already talked about ((Skeleton Animation Nodes Tutorial|creating skeletons in a previous tutorial), so for this, we take a humanoid skeleton as granted. The image below shows the skeletal structure, and the global joint positions represented by quads in the renderer.
A humanoid skeleton created inside a subpatch. The joint positions in world space are computed by the GetJointTransform (Skeleton) node.
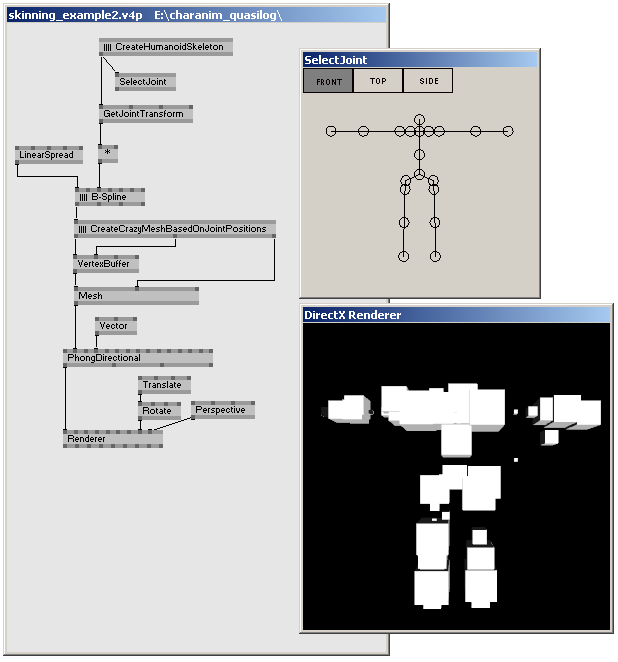
We can use the joint positions to create some fancy 3D geometry. For this example, I'm going to build one from some boxes. I'm not going into detail on how I did this, because it's not looking that awesome anyway, so we will take this as granted as well ;)
Some fancy 3D geometry dynamically built based on that given skeleton. The computed vertices are passed into a VertexBuffer, which flows into a Phong shader effect.
Skin it
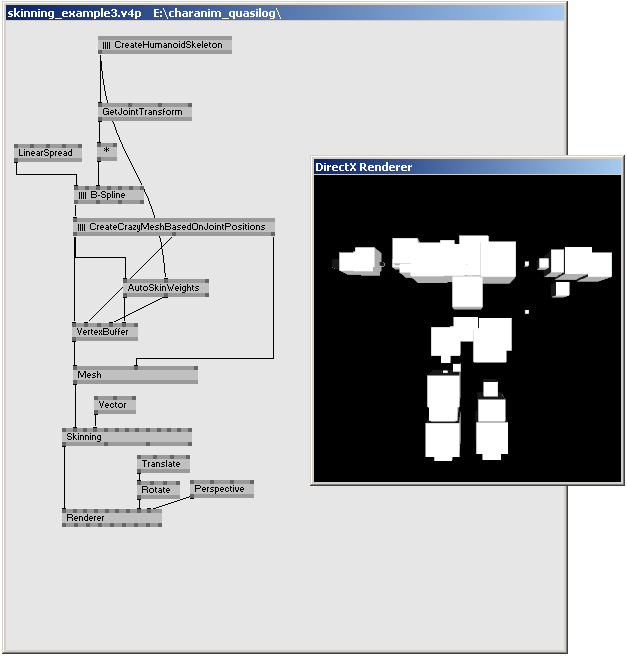
The only way to create perfect skin weights still is manually doing it in a modelling package. This would be the way to go, if we created a model e.g. in Maya and imported it into VVVV using the COLLADA format. Since we built our geometry in VVVV, we need a way to create skin weights in VVVV as well. There are algorithms which automatically calculate skin weights. The most trivial of all is fully assigning a vertex to its nearest joint, which of course results in a rigid skinned mesh. Exaclty this is done by the node AutoSkinWeights (Skeleton). It takes vertex coordinates and a skeleton, and computes simple skin weights. Of course, there are smarter algorithms, likehttp://www.mit.edu/~ibaran/autorig/using heat maps</a>, which aren't implemented yet.
Using the AutoSkinWeights (Skeleton) node to automatically determine skin weights for the created geometry. It simply assignes every vertex to its nearest joint, which results in a rigid skinned mesh. Skin weights and bind indices computed by the AutoSkinWeights node flow into the VertexBuffer node (you have to enable those pins in the inspector!).
Deform it
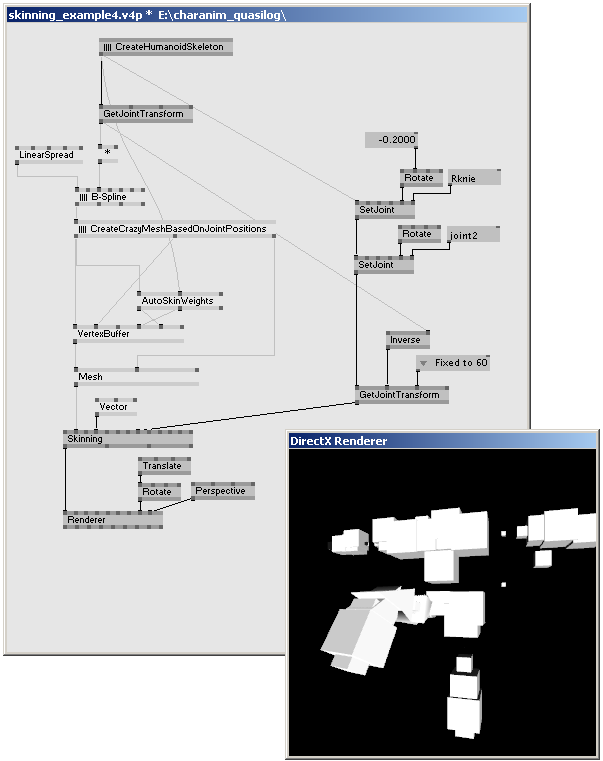
Since our mesh is now officially skinned, we can go on and actually deform it. The image above already contains the Skinning.fx shader effect. This effect does the calculation of the deformed vertices based on the joint transformations of the skeleton. All we have to do, is using GetJointTransform (Skeleton) on a posing skeleton, to get all the joints' compiled transformations, and pass it on to the Skinning effect. The image below shows, how this would look like.
The SetJoint (Skeleton) nodes rotate the character\'s hip and knee. The resulting, possing Skeleton object flows into the GetJointTransform (Skeleton) node, which calculates the combined joint transformations. The Skinning shader effect deforms the geometry based on those joint transformations.
The inverse bind pose transformation
There's still one thing in the image above, that has to be clarified: the 2nd input of GetJointTransform (Skeleton), which gets the inverse of the initial, unanimated joint transformations. This is, what in literature is referred to as the Inverse Bind Pose Transformation (IBP). The IBP holds information about the bind pose - the skeleton's pose in the moment, the skin weights of a geometry are defined.
In our example, the skeleton's initial pose, and the model's initial pose match up, so the IPB is just the inverse of the "still standing" skeleton. Sometimes, this is not the case, e.g. if you use the same skeleton for different meshes. If you are using a mesh you imported from an external source, the IBP should be delivered by the importer.
A word on software skinning
Although using a shader effect for deforming geometry is definitly the common way to go, in certain cases you have to calculate the vertex positions on the CPU. This is, e.g. if your character rig exceeds the current hardware limits of 60 joints or 4 influences, or if you need the transformed vertex positions for further processing. In that case you can use the SkinDeformer (Skeleton), which basically does the same calculation as the Skinning vertex shader effect. However, instead of GPU calculation, SkinDeformer (Skeleton) works on the CPU, and returns the deformed vertices as vector spread, which then can run into a vertex buffer, or can be used however you want.
anonymous user login
Shoutbox
~3d ago
~9d ago
~9d ago
~10d ago
~23d ago
~1mth ago
~1mth ago
~1mth ago
~1mth ago
~2mth ago


