
Devices-DMX4ALL
Introduction
The translearn stage was set to be lit by three lights, each had to be controlable in terms of light intensity.
Chosen equipment:
3 x lamps (for the test setup we used ordinary lofifunk lamps running on 220V)
1 x DMX512 sender board (DMX 4 All)

This device receives DMX orders from the connected computer via its RS232 port (in the DMX512 protocol) which it can store on up to 512 data channels in its microcontroller, that way there is no need for a continous feed of data. (Using serial ports it is possible to connect numerous DMX senders to one computer). The sender then send data to the dimming pack.
(At the bottom of the circuit board in the middle (where that hole is) there was supposed to be a voltage regulator (transforming the 9-12V incoming to 5V used for the processors), since we fed it directly with 5V.)
1 x 4 Channel Digital Dimming Pack (ShowTec Multidim MCII)
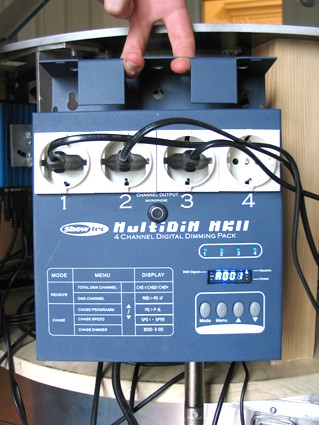
Receives commands from the DMX sender (via the DMX cable) and accordingly dims or lights the connected lamps, which are plugged into the respective power sockets.
more on this device in specific and technical data for the other devices in general, later
Equipment links:
DMX4All sender homepage
How To
For now I'll be describing how to set up the system on one computer, controlled by a midi device. And later we'll have a look at how this thing was implemented into the controlling system of our stage.
DMX sender - assembling, conneccting, communcating
- Since the DMX sender board came in loose parts, some assemblig and soldering had to be done. (More? Just make shure you eventually insert the circuits correctly into the corresponding sockets =))
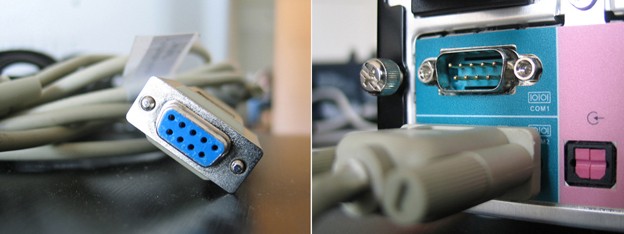
- Now we have to power the sender with 9-12V AC/DC, 200mA and connect it through a serial cable to the COM-port of your computer. (Again, in our case we're feeding it directly with 5V)
- Its time for a communnications test. We used a programm called HyperTerminal (which is included in Windows95, 98 and NT 4,0) to send the given ASCII commands to the sender to check if it was running properly.
The settings for the RS232 port on your computer should look like this:
Baud rate: 19200/38400 (Depends on your setting in the DMX sender setup) / Data bits: 8 / Parity None: None / Stop bits: 1
HyperTerminal - free version for private use
Since we wanted to control the lights from a VVVV lets move to the patching part.
The VVVV light control patch
DMX protcol - how go?
The plan is to eventually record a light-control sequence for the different chapters of our stage-play according to the screenplay to be developed later on. Since we wanted to use a sequencer to record the sequences, we had to be able to control the light via a midi device. For that we had to build a midi patch suitable for the midi equipment used (in our case the Behringer FaderBox).
There are two protocols with which to send commands to the DMX sender. One is set up for the sending of single commands in ASCII characters. The other is to block send orders in hex? (if the faster, block sending is your flavor, check msberger.
- We used the ASCII based protocol, since we only had 3 lights and as mentioned before planned to record the values for the lights via midi later on.
The ASCII command string for values begin with a 'C', followed by 3 ASCII characters which determine the channel spoken to. This value has to be in the range of 0 to 511 (the corresponding DMX channels).
This is followed by a 'L' and again 3 characters with a value between 0 and 255. This value sets the amount of light to be emitted.
For example the order C000L255 tells channel 1 to set the connected light to a value of 255. (Lamp1 is fully lit) As a confirmation of correct receiveing the sender sends back the ASCII character 'G'
There are additional commands with which you can info from the sender, store values and so on, those are all documented in the DMX sneder manual.
To the patch!
- This is the finished light control patch and the included dmx dimmer patch.

Lets have a looks at a few elements the dmx dimmer patch:
- Count
Built in to guarantee that the patch will be able to deal with any amount of incoming midi-channel values. It tells the I knot how many slices to expect and collect. That way this module stay expandable beyond three lights.
- FormatValue / Map
Since the midi device sends values from 0 to 1 but the DMX sender needs an ASCII command, the module needs to format the incoming channel id and midi value into ASCII. While the Map knot transposes the fader values 0-1 to 0-255 for the 'L' part, the FormatValue knots change the single character id value (left side round) and the floating number fader values into two 3 character ASCII values.
- Add (String)
Puts together an ASCII string out of the set 'C' (1st pin), the incoming ASCII channel-value (2nd pin), the set 'L' (3rd pin) and the incoming ASCII light-value (4th pin).
- Change
Built in between the formatted value and the Switch it only passes on values when they change. (this increases the performance, since the DMX sender doesn't need a continuous sending of data). In case of a change of value it triggers the switch to let through the new/changed ASCII command.
- Add (String Spectral) at the bottom
Since there probably will be simultaneous commands for all three channels/lamps this knot adds up the three possible commands into one string. Which is then (upon change of value) sent through the RS232 knot to the DMX sender.
anonymous user login

Shoutbox
~7d ago
~13d ago
~13d ago
~14d ago
~27d ago
~1mth ago
~1mth ago
~1mth ago
~2mth ago
~2mth ago