Subpatches
Patching pages
The Concept
|
Visual programming tends to create huge and complex structures, which may look beautiful at times, but if you're seriously working on a little bigger project you'll soon want to use subpatches to modularize your work. |
 A patch and its subpatch (as a node and InABox )
|
The term Subpatch refers to a patch that is used as a node inside another patch. Thus the term describes only a specific point of view. In fact every subpatch is an ordinary patch that is only called a subpatch when referred to from the patch its node is placed in. Likewise we can call a patch a Parentpatch when we're referring to the patch that holds the node of the patch we're talking about. An example: Patch1 contains Patch2.
seen from Patch1: Patch2 is a Subpatch seen from Patch2: Patch1 is its ParentPatch In other words: a patch can contain many subpatches but each patch only has one parentpatch. |
 Cascading structure of subpatches as seen in the Finder window
|
According to this definition every patch that we see is also represented as a node in some other patch forming a hierarchy of patches. The top of this hierarchy is called the Root and can always be opened via the shortcut ALT+R. |
|
It may also help to understand that subpatches are only a visual clue to the user but vvvv does not understand them. In fact to vvvv it does not matter if you put all your nodes in one huge patch or use subpatches to cleverly structure your program and make it human readable. Learning when and where to best modularize, ie. where to draw the line between one patch and its subpatch(es) is one of the biggest challenges when learning the art of patching/programming. If you're up for some general tips read: Software Engineering Patterns with vvvv. |
 |
FinderIn order to get an overview of all the nodes in a patch or even the whole hierarchy of your programs patches open the Finder or use CTRL+TAB to cycle through all open windows. |
Creating a Subpatch

 |
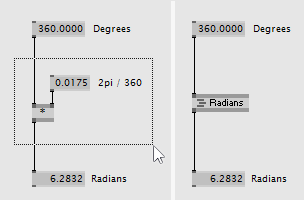
Pin VisibiltyA pins visiblity can always be changed by the user via the Inspektor. As the designer of a subpatch you can define a default for the pin represented by each IOBox by setting the Pin Visibility of the IOBox to the respective value. |
 |
Detecting changed InputsEach IOBox has a hidden Changed output that can be used to detect if its input has changed. You can activate this output by changing its visibility via the Inspektor. Use it to only make a subpatch calculate its outputs when any of its inputs has changed. Alternatively create an Enabled input to let the user of the subpatch control its execution. |
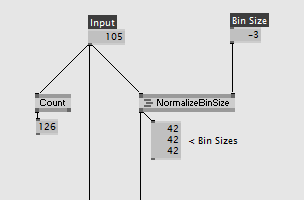 |
Dealing with BinSizeIf you want your subpatch to expose a Bin Size for an input then make sure to use one of the handy NormalizeBinSize nodes (available for many categories). It simplifies working with Bins and Bin Sizes within a subpatch in that it translates a given bin size (positive or negative) into the actual bins you'll have to calculate with. |
Instantiating a Subpatch
 |
You can create an instance of a subpatch like any other node using the NodeBrowser. Type 't ' (t followed by Space) to filter only for subpatches in the current patchs directory. Multiple instances of a subpatch can happily co-exist and still compute their own data. But beware that if you change anything inside a subpatch that obviously changes for all instances! EncapsulationA subpatch can include an instance of another subpatch which in turn can include an instance of another subpatch and so on. There is no limit to this encapsulation. RecursionA subpatch can not include an instance of itself! vvvv will not allow you to patch such a recursion. Many recursive algorithms can be solved in an alternative way. See Spread Sinks for a hint or look into programming your own plugin in c# to solve such a particular problem. |
Closing vs. Hiding Windows of Patches
|
When handling the windows of patches make sure you understand the difference between closing and hiding. Please refer to Window Modes for details. Also note that you can stack windows on top of each other to save precious screenspace. Please refer to Docking for details. |
Controlling Evaluation
 3 scenes with the Timing Debug-Mode turned on.
|
It is sometimes desireable to pause evaluation of a subpatch when its output is not needed. Note that every subpatch-node has an Evaluate only visible in the Inspektor by default. Disabling this pin stops the evaluation of this subpatch (and of course also all of its children).
Never put nodes that receive inputs from a physical device (like the mouse-nodes, UDP, TCP, Midi, ...) in a patch that you disable. Those nodes may still be collecting input even when in a patch that is disabled which may result in an unexpected behavior the moment you re-enable evaluation for that patch.
|
Modules
 |
Modules are basically ordinary patches that are mostly created to be used as black-boxes (ie. without the user typically looking inside them). In order to make patch into a module follow these steps:
|
anonymous user login

Shoutbox
~18h ago
~20h ago
~5d ago
~13d ago
~21d ago
~1mth ago
~1mth ago
~1mth ago