Blog
Blog-posts are sorted by the tags you see below. You can filter the listing by checking/unchecking individual tags. Doubleclick or Shift-click a tag to see only its entries. For more informations see: About the Blog.


When we talk with our trusted VL pioneers we often find them implementing timeline like applications, which come with the main problem to find the keyframe that is the closest to a given time, often even finding the two closest keyframes and interpolate between them weighted by the position of the current time.
Easy? Just order all keyframes by time and start at the first keyframe and go thru the collection until you find one that has a time greater than the time you are looking for. This is called linear search and might work very well at first, but obviously has two performance problems:
- The bigger the time you are looking for gets, the more checks you have to perform
- The more keyframes you have, the more checks you have to perform
Enter Binary Search
Binary search does the same task in a much smarter way: It starts with a keyframe in the middle of the collection and checks whether the time you are looking for is greater or smaller than this middle keyframe. Now it can rule out half of all keyframes already and search in the interesting half in the same way: Take the middle keyframe and compare its time. As this rules out half of all remaining keyframes in every step, the search is over very quickly. In fact it's so stupid fast that on a 64-bit machine the maximum steps it has to perform is 64, because the machine cannot manage memory with more than 2^64 elements.
VL Nodes
The VL nodes cover several use cases. Depending on how your data is present you can choose from the following options.
Only Values
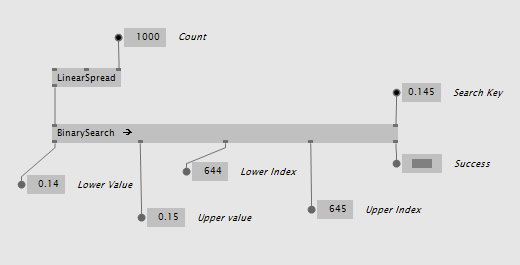
The most simple node is just called BinarySearch and takes a collection of values. It returns the element that is lower and the one that is higher, their indices and a success boolean indicating whether the search key was in the range of the input values at all:
Key Value Pairs
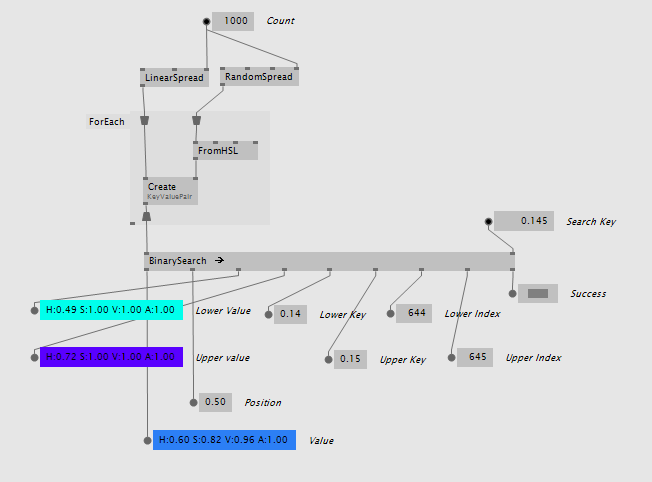
For simple scenarios that don't require a custom keyframe data type the BinarySearch (KeyValuePair) version can be used. It operates on the simple data type KeyValuePair that comes with VL.CoreLib and returns the values, keys and indices:

It also comes as BinarySearch (KeyValuePair Lerp) with an integrated linear interpolation between the values that is weighted by how far the search key is from the two found keyframes:
Custom Data Types
If you have your own keyframe data type the BinarySearch (KeySelector) is your friend. It can be created as a region with a delegate inside that tells the binary search how to get the key from your custom type:

There is also BinarySearch (KeySelector Lerp) which has the same delegate and needs a Lerp defined for your keyframe that it can use internally. You keyframe data type could look like this:
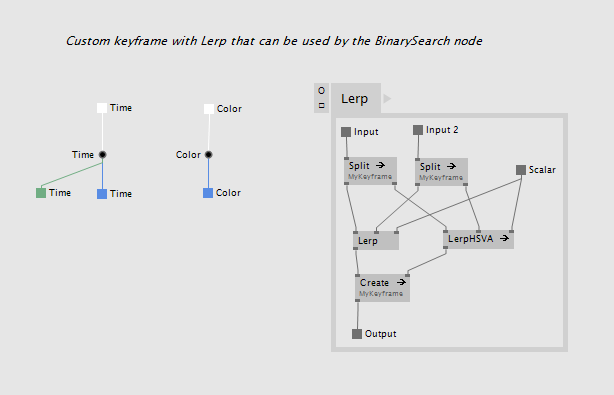
The usage is then basically the same:

Other usages
A timeline is of course just one use case where binary search is useful. All data that can be sorted by a specific key can be searched by it.
Speaking of sorting, if you add elements to a sorted collection binary search can help you to find the index at which to insert the new element. Use the Upper Index output as insert index like this:

So it can help you to keep the very same collection up to date that you use to lookup the elements.
A usage example can be found in girlpower\VL\_Basics\ValueRecorder.
Enjoy the search!
Yours,
devvvvs
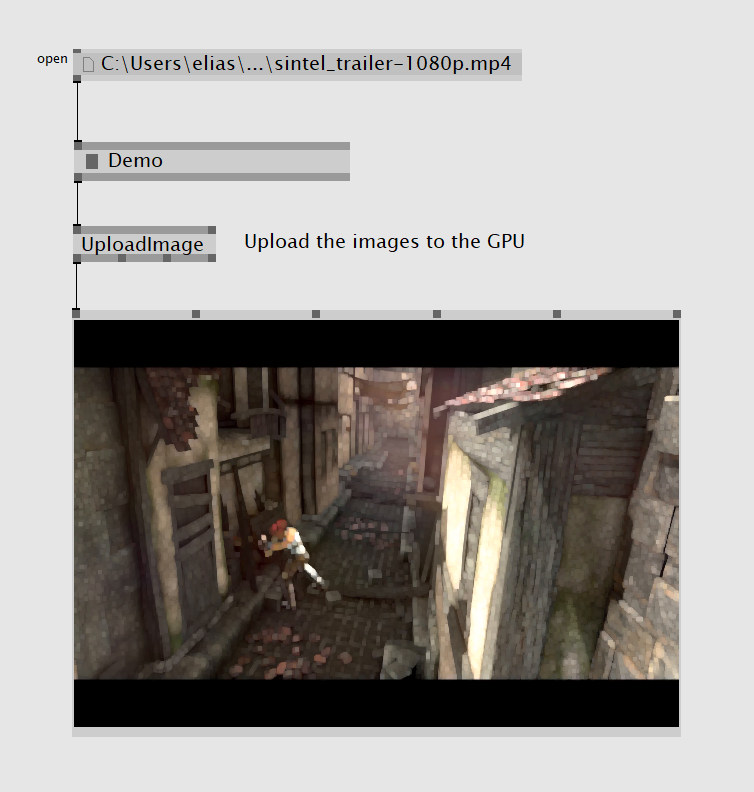
In the VVVV world you'll find four new nodes, UploadImage and UploadImage (Async) - both for DX9 and DX11 returning a texture. The former just takes an image and when requested uploads the image to the GPU, the latter takes an IObservable<IImage> and will upload whenever a new image gets pushed.
In the VL world you'll find ToImage nodes which allow you to build images out of arbitrary data. Here is a little Game Of Life example:


That one image is gray and the other red comes from the fact that we map a pixel format with one red channel to a format with one luminance channel in DX9 - not entirly correct, but better than seeing nothing at all.
The interface in detail
So what is this new image interface exactly? Well it came up in the past (https://discourse.vvvv.org/t/bitmap-data-type/6612) and re-surfaced again in VL - the topic of how to exchange images from different libraries. Nearly all of them come with their own image representation, like a Mat in OpenCV, a Sample in GStreamer, a Bitmap in GDI, an Image in WPF or just plain pointers in CEF - just to name a few we stumbled accross in the past.
All of those libraries provide different sets of operations one can perform on their image representation, they have different sets of supported pixel formats and they also differ in how they reason about the lifetime of an image. In the end though we want all those node sets which will be built around those libraries to work together.
We therefore decided to add a new interface - simply called IImage - to our base types in VL with the intention to allow different node libraries to exchange their images. The idea is that the node libraries itself work with the image type they see fit and only provide ToImage and FromImage nodes which will act as the exit and entry points. Whether or not those entry and exit points have to copy the image is up to the library designer and probably also the library itself. For some it will be possible to write simple lightweight wrappers, for others a full copy will have to be done. If a certain pixel format is not supported by the library it is fine to throw an UnsupportedPixelFormatException which will inform the user to either change the whole image pipeline to a different pixel format or insert a conversion node so the sink can deal with it.
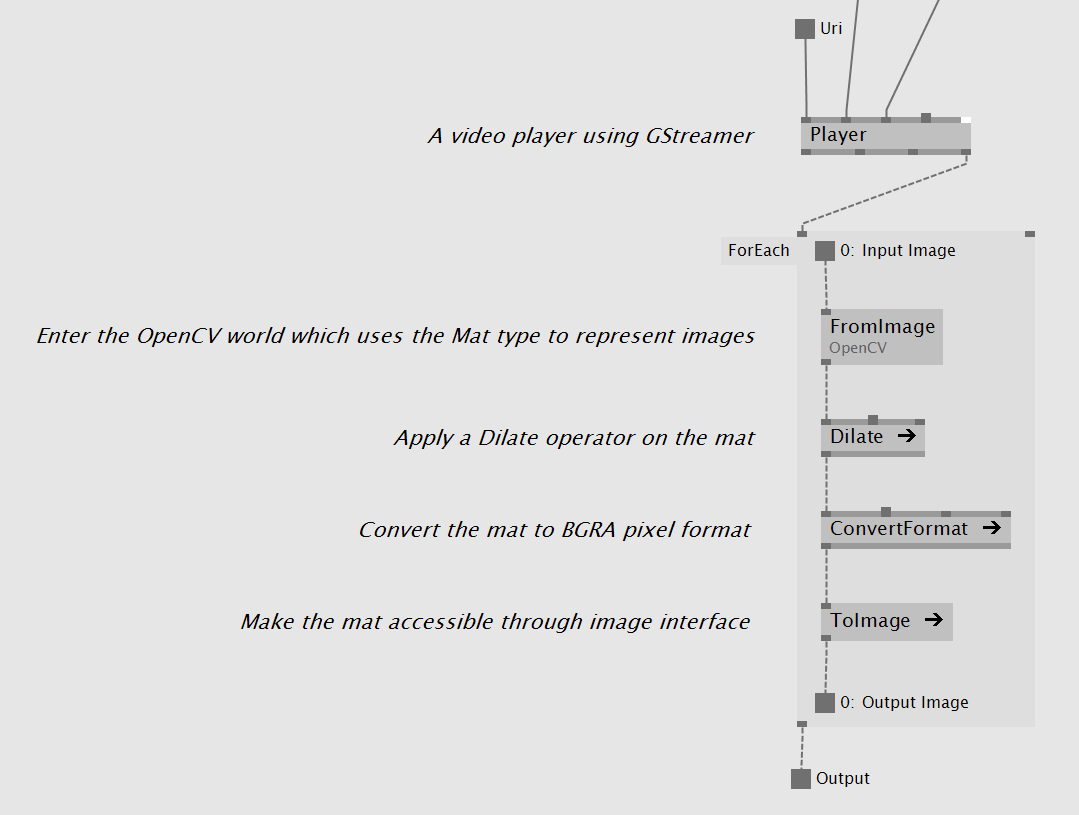
Before diving any deeper here are two screenshots from a little example image pipeline, getting images pushed in the streaming thread from a GStreamer based video player, using OpenCV to apply a dilate operator on them and passing them down to vvvv for rendering:
The image interface comes with a property Info returning a little struct of type ImageInfo containing size and pixel format information. With this struct it's easy to check whether the size or the pixel format of an image changed. The pixel format is an enumeration with just a few entries of what we thought are the most commonly used formats. Since there're many many others the image info comes also with a OriginalFormat property where an image source can simply put in the original format string - whatever that is. But it at least gives sinks a little chance to interpret the image data correctly.
/// <summary>
/// Gives read-only access to images.
/// </summary>
public interface IImage
{
    /// <summary>
    /// A structure containing size and format information of the image.
    /// </summary>
    ImageInfo Info { get; }

    /// <summary>
    /// Gives access to image's data. Must be disposed after being used.
    /// </summary>
    IImageData GetData();

    /// <summary>
    /// A volatile image is only valid in the current call stack.
    /// </summary>
    bool IsVolatile { get; }
}
The second method on the interface called GetData is used for reading the image. It returns the IImageData interface pointing to the actual memory. Since the IImageData inherits from IDisposable the returned image data needs to be disposed by the caller. With this design it should be possible to implement all sorts of image reading facilities - as pin/unpin, map/unmap, lock/unlock etc.
/// <summary>
/// Used for reading images.
/// </summary>
public interface IImageData : IDisposable
{
    /// <summary>
    /// The pointer to the data.
    /// </summary>
    IntPtr Pointer { get; }

    /// <summary>
    /// The data size in bytes.
    /// </summary>
    int Size { get; }

    /// <summary>
    /// The scan size (one row of pixels including padding) in bytes.
    /// </summary>
    /// <remarks>If the scan size times the image height is not equal to the size data copying has to be done row by row.</remarks>
    int ScanSize { get; }
}
In order to avoid copying data the image interface comes with a last property IsVolatile which when set tells a sink that the data in the image is only valid in the current call stack - so it can either read from the image immediately or if that is not possible it will need to clone it. We expect image implementations to return data of the default image in case the read access happended too late. Imagine one puts volatile images into a queue without copying them first, the result should be a bunch of white quads so those errors should become visible immediately.
In case the volatile flag is not set we expect the image data to stay the same so no further copying is necessary on the sink. It can hold on to the image as long as it wants.
We further provide a couple of helpful extension methods to the IImage interface like Clone/CloneEmpty or making an image accessible as an System.IO.Stream
With this in mind let's look how to expose library specific image types:
- In case the library newly allocates the memory for the image on the managed heap, not much has to be done except of writing a little wrapper implementing our image interface, returning false on the IsVolatile property and basically just forwarding all interface calls to the original image type.
- The library takes the memory from a pool or uses some ref count mechanism. In this case it's most certainly mandatory to ensure that the original image gets disposed. If the image gets pushed from the library we recommend to simply push the image further and dispose it right after. If the image needs to get pulled from the library the wrapper should also implement the IDisposable interface and hand it downstream inside the resource provider monad so that the disposal behavior is correct once all the sinks are done using the wrapper. The third option is to simply copy the data into a private image one can hand downstream.
- The library always returns an image pointing to the same memory. Similiar to the previous case except that one must not call dispose on the original image.
Example implementations can be found in VL.Core, VL.OpenCV and VL.GStreamer

Dynamic Buffers
Current vvvv alpha and upcoming vvvv beta36 has a new set of nodes that allows you to quickly upload data from VL to the graphics card. We had a WIP forum discussion about it here: VL - Custom Dynamic Buffer
On the VL side the nodes are called ToBufferDescription and we have them for the basic data types that usually hold big chunks of data: Spread, Array, IntPtr and Stream. The vvvv side is rather easy and only has one node called UploadBuffer (DX11.Buffer).
Primitive Data Types
Primitive types work out of the box and don't need any special treatment. Just make sure you define the correct Buffer type in the shader. This works for Integers, Floats, Vectors and so on, everything that is available in the shader as primitive type. Here is an example for Float32:

The only exception is Matrix it needs to be transposed in order to work like a normal transformation input. If you send a large amount of individual matrices to the shader the most efficient way is to do the transpose in the shader directly:
If the same matrix is re-used very often or you don't have access to the shader code simply transpose in VL:
Custom Data Types
If you want to define your own data types like light information or a custom vertex type in the shader then you need to pack the data accordingly in the buffer description. For this task the ToBufferDescription (Stride) nodes are used. They allow you to make a buffer description out of primitive types like float or even byte and set the stride size of your custom type in bytes so that the shader can read the custom type directly out of the buffer.

Matrix hint: If you define a matrix in a custom type in the shader you can use the row_major modifier to automate the transpose operation.
struct MyLightType
{
    float3 Direction;
    float Brightness;
    row_major float4x4 Transformation; //set matrix type
};
Performance hint: If you can, design your custom types in a way that the byte count is a multiple of 16, sometimes it makes sense to insert unused floats as padding:
//would have 20 bytes, but blown up to 32 bytes (2 x 16) for faster read performance
struct Circle
{
    float4 Position;
    float  Radius;
    float pad0;
    float pad1;
    float pad2;
};
More info: https://developer.nvidia.com/content/understanding-structured-buffer-performance
Custom types in C#
If you are a C# coder you can also define a struct in C# with attribute StructLayout(LayoutKind.Sequential) and the same byte layout, import it in VL and pass that directly into the buffer. Then you don't need the node with version StrideSize because the data type size already matches.
[StructLayout(LayoutKind.Sequential)]
public struct Circle
{
    public Vector4 Position;
    public float Radius;
    float pad0;
    float pad1;
    float pad2;

    public Circle(Vector4 position, float radius)
    {
        Position = position;
        Radius = radius;
    }
}
Dynamic Raw Buffers
While in the process of doing the dynamic buffer nodes it was easy to add raw buffers. These buffers are from older shader models and can only be filled with bytes. On the shader side however you can also define Custom types. Only difference in HLSL is that you write Buffer<YourType> instead of StructuredBuffer<YourType>.
The node set is basically the same except that the VL part is not generic and only accepts bytes as input. The node names are ToRawBufferDescription in VL and UploadBuffer (DX11.Buffer Raw) in vvvv.
Raw buffers have no advantage except when you have to deal with an older graphics card, driver or shader code.
Examples
A VL patch with shader code can be found in latest alphas girlpower\VL\DX\DynamicBuffersAndTextures.v4p. And it is also used by @mburk for material management in his latest superphysical pack.
So now you can start sending your data up to the card and enjoy the speed. As always, if any questions arise hit us up in the forums.
yours,
devvvvs
A quad is quadratic

Positioning an element at the mouse position results in that element being shown at the mouse position

Using touch positions for positioning results in elements drawn at your finger tips

Interact with objects in world space, even in complex multi screen setups. Do that with the system cursor, not a displaced rendered cursor

All this wasn't something that you could take for granted. Up to now.
I had to tease you first, before going into detail. If you think about the statements above, or even don't think about it, all of the above should be just normal, no-brainers. Having a not-quadratic screen is the case 99% of the time. These cases occur that often, we should make them easier to work with.
So from now on we have
- Auto Aspect Ratio in the renderer, so you don't need to do that AspectRatio (Transform) involving cylic graph with the 3 links
- you can disable Auto Aspect Ratio and still feed your own for the more complex cases
- mouse, touch, gesture nodes are now reporting positions in our notion of projection space, an undistorted space that didn't get treated by the aspect-ratio transformation. These postions are just easy to work with as you saw above.

The main output of the mouse is the Position (Projection) XY pin, values in the case above go from (-1.78, -1) to (+1.78, +1), reflecting that the renderer is not quadratic.
All the details
What's that Projection Space?
The underlying technology (DirectX) comes with the following spaces and transformations, to get from one space to the other:
              World T.           View T.           Proj. T.
 Object Space   ->   World Space   ->   View Space   ->   Proj. Space
World Transformation typically is set by the Transform pin at your "quad", that takes it from object space and places that object within the world (the 3d scene).
View Transformation is what you connect to the renderer and is about the position and orientation of your camera.
Projection Transformation is the other input on your renderer, that is for making your scene compatible to a 2d screen. It pojects that 3d stuff onto a screen.
Now, while the underlying DirectX also mixes aspect ratio into that transformation, vvvv at some point started to distinguish lense projection and aspect ratio transformation, which now feels to pay out in the end.
So here is our notion of spaces and transforms:
              World T.           View T.           Proj. T.          Aspect Ratio T.
 Object Space   ->   World Space   ->   View Space   ->   Proj. Space   ->   Norm. Proj. Space
Our renderer comes with this additional pin Aspect Ratio (and now also comes with that auto aspect ratio feature), treating this transformation a seperate step. Since the transformations are seperated, we got an additional space that you can think in.
And this is the space you want to be in. This at least is our theory. In our projection space the aspect ratio transformation didn't get applied yet.
Let's look at some gif before we theorize further:

Here we see how to operate in projection space when a camera is attached.
With the node WithinProjection (Transform) we tell the system that we want to operate in projection space, which is the same as saying "do not care about the camera (don't apply view and projection transformation as we already are in the right space)". So the spheres get affected by the camera, the quad does not get affected by the camera.
So what you take from the lesson should be that mouse pin Position (Projection) XY goes well together with the WithinProjection (Transform) node. The node you only need if a camera is connected to the renderer.
Normalized Projection Space
Now, the next step the pipeline does is applying aspect ratio, which distort everything in a way that a quadratic space matches the rectangular window or viewport. This is just technical necessity as DirectX asks for that. We are now in normalized projection space. You know, that space where left & bottom border are at -1, and right & top border are at +1. The one that you learned in your first tutorial about.
We always thought that this is the nicest space to think in, which is obviously not true. It feels nicely quadratic in size, which just doesn't align to the fact, that your renderer typically is not. So it is a distorted space.
Several render passes
Here is how we still give it a raison d'être:
If you have several render passes you often just want to have a fullscreen quad textured by a previous render pass. Now how would you place a quad so that it goes from left to right border and bottom to top border. Well this is obviously easy to do in a space where these borders are always at a fixed position like in the normalized projection space.

What if you want to use and render the mouse in an early render pass, maybe with many viewports, softedge and aspect ratio settings, while actually hovering with the mouse over the final renderer, that comes with different settings? Does this align?
Well, this is a rare case where you again need to use manual aspect ratio nodes. With them you can adjust how to map to meaningful mouse positions that make sense in an earlier render pass. Actually you just need to reason about the aspect ratio of your orginal scene to make this work nicely. Note however, that in this special case - especially when softedge is involved - system cursor position and rendered cursor position don't align anymore, as you were used to in earlier vvvversions. Note that the editors from the editing framework still work, you just need to use the Cursor node to visualize the cursor, since the system cursor is off.

Old patches and a breaking change
Patches get converted so that they now work with the new mouse positions, those in projection space.
By that all patches fit well together. We are pretty sure that the benefits outweight the cons. This however still is a breaking change. If you have a patch where you don't use the mouse position for positioning elements, but map it to something else, and experience that the new value range doesn't feel right, you need to manually switch to the old behavior. Check the mouse node to access the now hidden Position (Normalized Window) XY, to access the exact old behavior. Gesture and Touch nodes come with the same pins.
Old renderers get converted in a way that the Auto Aspect Ratio is turned off - on newly created renderers it's turned on.
Patches working with touch or gesture were complicated as they just had to correct the touch position by manually transforming it in compliance to the aspect ratio. Where with mouse you got away with showing a rendered cursor that is just displaced, touch and gesture just don't let you do the same trick. You really expect the elements under your fingers to react. Those patches get converted in a way that they still work by using the Position (Normalized Window) XY, but you should consider cleaning that up by using the standard output Position (Projection) XY and throwing away all the unnecessary aspect ratio related tweaks and hacks.
DX11
Directx 11 doesn't come with the features for now. There would of course be a way to do the same with DX11, but let's see first, if the new system prooves to be easier to use for the majority of the tasks, while not failing at the more complex setups. When we have that proof of concept, it'll be doable to copy the concepts over to DX11. Let's wait for that first.
Depending on whether new DX11 builds shall still support older vvvversions or not, the implementation gets trickier or easier. So give us some time here to figure out what route to take. Thank you!
As you might know, enums in vvvv got our attention several times in the past. But still, we found something to improve.
There's been the NULL (Enumerations) node, that we now decided to drop.
Often when using Ord2Enum, String2Enum, Enum2Ord or Enum2String you additionally needed this node to specify which enum you actually want to work with.
Now, Ord2Enum, String2Enum, Enum2Ord, and Enum2String come with a configuration pin that lets you specify the enum. So no need for NULL anymore.
The mentioned nodes got legacy. Old patches will be converted in a way that they still use these legacy versions. (NULL (Enumerations Legacy), Enum2Ord (Enumerations Legacy)...)
If you want to update your patches, so that they work with the new versions
- delete the null node
- double click on the legacy Ord2Enum (..) node and select the new node in the node browser
- select the right enum (using the inspector). Yes, the list wasn't sorted alphabetically in earlier versions. Sorry for that!
The patches should get cleaner in the end, which should make them easier to understand.
The system has less to infer over links (less magic = less unwanted side effects). It just takes the enum specified.
Side note:
As the enum encoding changed (in vvvv50beta35.7) and now works with strings, you now are allowed to connect a source of one enum to a sink of another enum:

There just might be cases where this makes sense.
EDIT:
It's a bit unfortunate, but we had to keep the old nodes still active. There are cases where the enum in question is not available via the global enum list. E.g. a shader has this technique pin that can differ from shader to shader and sometimes even between instances of one and the same shader. So these enums need to be "pushed" towards the connected Ord2Enum node. So you still need the old nodes.
The old ones keep their names.
The new nodes now are named Enum2Ord (Enumerations Explicit), ...
Null (Enumerations) is legacy.
Please excuse the confusion.
Newsflash!
Here are two new little features we want to make sure you're aware of. Not completely finished but already helpful:
StepByStep

Note how the Quad (topleft) indicates run/pause. Tremendous you say? Indeed, but beware the following caveats for now:
- this works only for vl, so if you have parts of your patch in vvvv, those will still continue to run as usual!
- tooltips don't work in this mode yet, so you'll need IOBoxes wherever you want to inspect values
- no stepping through slices of loops
Still you'll see that in cases where you're looking for a logical problem in your patch it is already useful to be able to step through its execution one frame at a time to better understand how it is evolving.
JumpToError

This can be useful when you're on a debugging spree and expect an error to happen at some point. Activate this option to be brought to the point where the error occurred, the moment it happened. Saves you some navigation and highlights the nodes involved leading up to the error. Again press F6 to step or try F5 to get the patch running again after you solved the problem.
Caveat: Look closely, the error message in the tooltip actually belongs to the Add of the Dictionary. The reason for that is code-optimization which sometimes leads to the error-indicator being one node off. A setting to disable code-optimization is pending..
As mentioned, both features are not finished but are a first step into the direction of better debugging support. Still more to come..
NEWS!
If you're writing your own dynamic plugins in C#, we got something for you! If not, still read on, so yo know, just in case..
The C# language is evolving all the time with nifty features. In order to be able to use those, you need a suitable compiler that understands those. So far, the C# compiler included with vvvv only supported language features of C# versions lower than 6. But no more:

Caveats:
- You need to have either Visual Studio 2015 or MSBuild Tools 2015 installed
- You have to enable the new compiler by using the commandline parameter /cs6 when starting vvvv
This is now activated by default for everyone even without the caveats as mentioned above!
So get yourself a fresh alpha now and do yourself a favor by using those new language features.
101 Tutorials
By using Firmata it was always easy to control LEDs, Motors, Relays,.. and to get data back from a bunch of Sensors.
Now it is also easy to get started if you are completely new in the field.
Check these basics tutorials in your vvvv folder:
girlpower\VL\IO\Firmata\00_Basics\

Fixes
- Talking via I2C protocol to your digital sensors is fixed and should be rock solid now. This example shows how to configure the ADX345 accelerometer and get its data:
girlpower\VL\IO\Firmata\00_Basics\06-I2C.v4p
- StringDecoder (Firmata) is returning now all strings sent by Firmata, not only the last one.
The Basics tutorials and fixes are now available in Alpha Builds.
Previously on Firmata:
Firmata Second Service
finally,
this is basically where we'd hoped to have been for NODE17: Have the new "node importing" feature in a state where we're quite confident with its workflow. We had it working already enough to demo at NODE as elias did at the keynode and we used it in the VL Nodes and Libraries workshop. But only now it is in a shape that we can talk more widely about it and actually recommend you to try it out for yourself in latest alpha builds.
Using .NET Libraries
To create a node for vvvv, always someone has to write some code. In the beginning it was only us who could do that. With vvvv vvvv40beta16 we introduced the PluginInterface that allowed everyone to write their own nodes.
For vl we came up with a new feature that now allows everyone to simply use operations available in a any .NET library as nodes without the need for vl specific coding. This means access to an endless number of nodes at the expense of only a few clicks. Big? Huge!
Two common scenarios are:
- you know of a functionality that comes with .NET standard library... simply go to your document > Dependencies > Files > Add .NET Framework Assembly, choose the assembly the functionality you're looking for is in and boom: you can now browser that assembly via the nodebrowser
- you find a .NET library you want to use on the internet orhttps://nuget.org... download it, go to your document > Dependencies > Files > Add Existing... choose the file and boom again: browsable via the nodebrowser
As good as this sounds and actually works in many cases, there are cases where using thirdparty libraries directly like this has a few peculiarities, stemming mostly from the fact that those libraries are usually not made to be used in a dataflow scenario like VL. For details, see the gray book on Using .NET Libraries.
Writing Nodes in C# or F#
Now that we can use any code from thirdparty libraries we can obviously also write our own nodes for VL, basically using any .NET language (so far we've tried with C# and F#). And the good news here is that it is dead-simple. While a plugin-developer for vvvv needs to follow the PluginInterface, ie. have some understanding of vvvvs workings, writing a node for VL requires no VL specific knowledge!
The simplest node you can write in c# looks like this
public static float Add(float input, float input2)
{
   return input + input2;
}
Build that into a .NET .dll and then simply use the library as mentioned above. For more details and example projects for C# and F# see the gray book on Writing Nodes.
Still Missing
Thankyouverymuchthatwasabouttime I hear you say and whatabouttherest?! Right. Now that creating nodes and libraries for VL is so trivl, obviously everybody will start doing it like crazy and we'll hopefully end up with a lot of nice packages and contributions soon. So how do we expect to handle those? Collect them in an addonpack again? Upload everything to the Contributions again?
No.
Here is the full workflow that we're aiming at:
- Save package from VL editor
- Upload package to nuget.org from VL editor
- Search and download package from nuget.org via a packagemanager (similar to VPM)
Sounds simple enough, but believe me for once, if you're looking at the details, this includes unsolvable problems (think package dependencies, versioning). Don't want to bore you with the details, just want to say, we're at it but as always, it may still take some time...
So now go ahead, use your favorite .NET libraries like a pro and hit us in the forum if you encounter any troubles.. Even if you don't encounter any troubles we'd love to hear about what you're working on. Try the new forum category WIP for this!
Dear jugglers of the bytes,
sorry this took so long! Almost five years ago we introduced the new datatype Raw for easier handling of byte streams in vvvv. It came with all the nodes you'd need, except probably the most important one, a Tokenizer. So for collecting incoming bytes via e.g. TCP or RS232 and making sure to separate them into the correct message-tokens you'd still have to fall back to the good old Tokenizer (String). Possible, but annoying.
Enter the new series of Tokenizer nodes:
- Tokenizer (Raw FixedLength)
- Tokenizer (Raw LengthPrefix)
- Tokenizer (Raw Postfix)
- Tokenizer (Raw Frame)
Users of Tokenizer (String) may remember that it was always a bit tricky to configure since it had quite a few options to configure it and you'd have to make sure to get those all right for your specific use-case. So now we've separated those use-cases and spent each of them an individual node. The nodes versions should be self-explanatory. If not, they all come with help-patches!
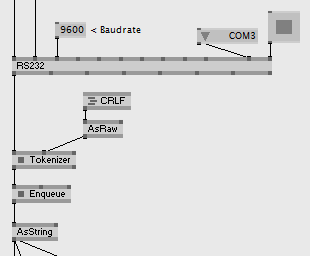
Now all of the Tokenizers always return a spread of tokens found in the last frame. So in order to simulate the Queue Mode of the original Tokenizer (String) here is how you do:
- Spread: take the spread as is
- Discard: take the last slice of the spread
- Enqueue: take the new Enqueue (Raw) node, which collects incoming spreads of raw and always only returns one of the collected slices per frame
Also, on the other side, if you're in the business of sending out a stream of bytes here are the counterpart nodes to frame your messages accordingly:
- PrefixLength (Raw)
- PostfixBytes (Raw)
- FrameBytes (Raw)
What the VL?
Of course. All patched in VL and even more practical to use over there because (once again) datatypes and delegates. The Tokenizer in VL is much more primitive in that it only collects all incoming bytes and then executes a delegates on the buffered bytes. The delegate allows you to easily implement more complex scenarios than the four preconfigured ones mentioned above.

The Firmata protocol for example fits non of the above mentioned simple cases as it has different types of tokens. Still the basic Tokenizer can be used to implement the firmata peculiarities on top of it. Further the delegate allows you to return the tokens already in your desired datatype. So instead of returning a Spread<Spread<Bytes>> as the Tokenizers in vvvv can only do, in VL it can readily return a Spread<MyToken> which is just so much more modern..
If you feel anything missing here or have any questions, please let us know in the comments!
The nodes are now available in Alpha Builds.
anonymous user login

Shoutbox
~2d ago
~2d ago
~6d ago
~14d ago
~22d ago
~1mth ago
~1mth ago
~1mth ago