HowTo Gameport
How to connect things to the Gameport
The Gameport was invented with the orgiginal PC in 1981 and is therfore a very simple and forgiving port. The electrical characteristics are very simple, it used to be built in everywhere, and there are many devices available. A great advantage of the game port, that windows has a built in control panel for testing the gameport.
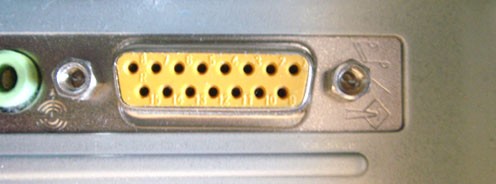
If you have a pc with that yellow female 15pin subd game plug, you can very easy connect up to 4 potentiometers and up to 4 switches to it.
| pin | purpose |
| 1 | +5V |
| 2 | A1 button |
| 3 | AX potentiometer |
| 4 | GND |
| 5 | GND |
| 6 | AY potentiometer |
| 7 | A2 button |
| 8 | unused |
| 9 | +5V |
| 10 | B1 button |
| 11 | BX potentiometer |
| 12 | MIDI TXD (computer -> midi) |
| 13 | BY potentiometer |
| 14 | B2 button |
| 15 | MIDI RXD (midi -> computer) |
Connect up to four switches between the four button pins and GND

Connect up to four 100kOhm potentiometers between one of the four potentiometer signals and the +5V pins.
There is much information on the internet, how to build your own joysticks.
see for example: http://www.epanorama.net/documents/joystick/pc_joystick.html
The GameController (Devices Analog) node will simply give you the results in vvvv as a number between 0 and 1. it can not be simpler.
How to configure windows for your selfmade joystick
Connect your circuit to the joystick port, go to the windows game controller control panel and assign one of the standard analog joystick types (like 4-axis, 4 buttons) to the port. otherwise windows will not know it - the controller will not show up in vvvv. Note that you can easily test your circuit in the windows control panel.
How to fool windows if you are building a trivial joystick
Important: Windows doesnt think users may like to have joysticks without potentiometers.
If you havent connected any potentiometers, replace them with a wire. So if you are not using any potentiometers connect pins 1 to 3 and 6 to 9 - otherwise windows will think your newly made joystick is broken and refuses to use it. Open up the game control panel and check
Windows will tell you about this in the control panel.
Building your own USB Joysticks
If you dont have a game port on your computer you can easily add one via USB.
JoyWarrior-Module
A small, cheap and effective solution for connecting switches and potentiometers over USB is the JoyWarrior24A8-8 Module. Check their website for more details.
A german distributor is Segor in Berlin.
This is the board when you get it


In addition you might need
- an USB Cable (cut in in half and just use the (for example conrad.de 743976)
- plug strips (f.e. conrad.de 739499) (cut them at length)
- socket strips (f.e. conrad.de 736368)
- Potentiometers with 100KOhms resistance (f.e. conrad.de 445819)
- Simple contact swiches
This is the board after some soldering

The wires within an USB cables should have a standardized color code:
- Red is +5V
- White is Data-
- Green is Data+
- Black is Ground
Connect the four colored wires to the printed circuit board. Make sure to double check the cabling: Short circuiting these wires is most likely to power-down your computer instantly and even may damage your computer. Also loose wires may make windows behave very nasty.
Connect your switches to the board any you´re done. same with the potentiometers. Note that you need to connect all three pins of the potentiometer to the board (This allows for some auto-calibration - the values will go from exactly 0 to exactly 1 within vvvv).
Here are some examples for things you can connect to the JoyWarrior Board:

Momentary Switch

Switch
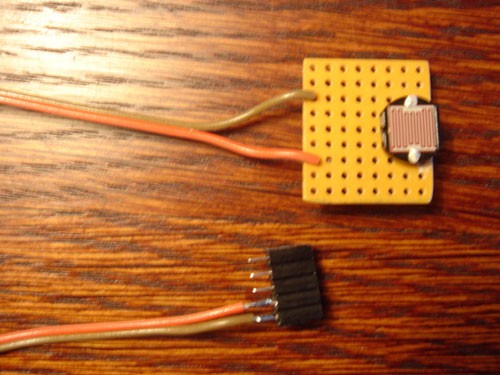
Light sensitive resistor used as a switch. Mount the resistor over a Lamp or LED or Monitor. Make sure light comes only from your light source. As soon as light arrives at the sensor, the resistance gets low, the circuit is closes, a 1 appears with in vvvv.

Potentiometer (100 kOhm)
Dismanting USB-Joysticks
The cheap and selfmade option would be dismantling an USB joystick and solder your own things to it.
Conrad USB Joystick Converter
Conrad sells a small adapter for connecting old analogue joysticks to the USB port. This adapter can be used very easily to connect your own selfmade "joystick" to an USB equipped computer
USB-JOYSTICK CONVERTER
Artikel-Nr.: 979074 - 62
Preis 19,95 EUR

make sure to use Setting 3 with vvvv
anonymous user login

Shoutbox
~7d ago
~15d ago
~30d ago
~1mth ago
~1mth ago
~1mth ago
~2mth ago
~2mth ago