cn.Tutorial Effects - Neighbouring Pixels
TOC: Of Effects and Shaders
Back: Texture Coordinates
Next: Multiple Textures
有一系列的图像处理滤镜,这些滤镜都是基于这样一种思考角度,就是在图像中决定一个像素的颜色要根据它相邻的像素(左边的,上面的,右边的,底下的,还包括对角线的)。
在像素着色器中应用这种滤镜关键的问题是当在一开始的时候你只有当前像素的坐标,你怎样获取一个相邻的像素。在像素着色器函数中你不能够很容易的获取它左边的相邻像素。首先你要理解它的材质坐标是如何正确的取样的。
通过给出的材质原始大小(宽度/高度)你能够在材质空间单位距离里计算出两个像素之间的距离。这个计算是很简单的:如果材质坐标0指定的是像素0,材质坐标1指定的是像素的宽度,一个像素的材质坐标和它相邻的水平的坐标的距离可以表示为1/WIDTH.因为在像素单元中,一个像素的大小当然是1X1在材质空间单元中一个像素的大小可以被想象成:
float2 pixelSize = 1 / float2(WIDTH/HEIGHT)
使用pixelSize.xy你就能获取相邻的像素从一个像素坐标中加上或减去它的值。你最好是在Patch中进行计算把结果传递到像素着色器上
float2 PixelSize; //where .x will be the width and .y will be the height of pixels
边缘检测
一个简单的应用边缘检测滤镜的例子,我们对每个像素取它左右相邻的两个像素,计算他们的不同,检测结果的绝对值如果是否比给予的阈值大。如果是的,像素被填入白色,否则的话,填入黑色。
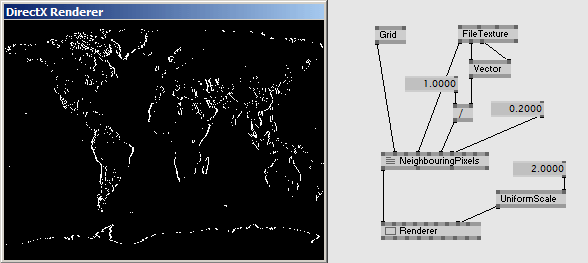
float2 PixelSize;
float Threshold = 0.2;
float4 PS(vs2ps In): COLOR
{
    //the texture coordinate offset with vertical coordinate set to 0
    float2 off = float2(PixelSize.x, 0);

    //sample the left and the right neighbouring pixels
    float4 left = tex2D(Samp, In.TexCd - off);
    float4 right = tex2D(Samp, In.TexCd + off);

    if (abs(ConvertToGray(left).x - ConvertToGray(right).x) > Threshold)
      return 1;
    else
      return float4(0, 0, 0, 1);
}
在上面的代码中有两件事情要指出:
- 命名为off的变量只是一个临时的变量,在第39和40行从当前像素减去它定位它左边的坐标,然后从当前的像素加上它定位它右边的坐标。
- 在42行中使用的.x元素:由于ConvertToGray函数返回一个4位浮点数但是对于后面的运算我们仅仅需要一个单独的亮度值,在这个阶段仅仅获取4位浮点数的第一个元素去比较相邻两个像素的亮度值。
为了进一步进行边缘检测我们需要在两个方向进行边缘检测。因此除了左右两边的像素我们还要检测上下两边的像素:
//the texture coordinate offset with horizonal coordinate set to 0
off = float2(0, PixelSize.y);
//sample the upper and the lower neighbouring pixels
float4 upper = tex2D(Samp, In.TexCd - off);
float4 lower = tex2D(Samp, In.TexCd + off);
当我们决定返回值的时候,我们就要同时顾及左右和上下两边的像素:
if (abs(ConvertToGray(left) - ConvertToGray(right)).x > Threshold
||
abs(ConvertToGray(upper) - ConvertToGray(lower)).x > Threshold)
    ...
在hlsl语法中 || 是布尔值或者的意思,如果左右像素之间差异超出阈值或者上下像素之间的差异超出阈值的话,我们把这个像素填入白色。
模糊
同样模糊的效果也可以用这种方法实现。希望模糊的效果越好,就要顾及到更多的相邻像素。因为每个像素材质取样数量限制在16,一个好的模糊效果要通过两个处理达到,首先水平方向,然后获得处理的结果从新在垂直的方向在进行一次模糊。因此现在让我们集中在垂直的模糊。
The idea is to sample a range of neighbouring pixels and add up their colors while weighing their influence corresponding to their distance from the current pixel. The current pixel gets the most weight, while the 2 left- and rightmost pixels are taken into account only with a smaller weight. The result then has to be normalized back to the range of 0..1 by dividing through the sum of all weights.方法是取样一个范围内的相邻像素根据它们和当前像素的距离来决定它们被影响的权重。当前像素获得最大的权重,而左右两个最近的像素获得稍微小一点的权重。通过除以所有权重之和的方法把最终结果映射到0到1的范围。
float2 PixelSize;
float4 PSHorizontalBlur(vs2ps In): COLOR
{
    float4 sum = 0;
    int weightSum = 0;
    //the weights of the neighbouring pixels
    int weights[15] = {1, 2, 3, 4, 5, 6, 7, 8, 7, 6, 5, 4, 3, 2, 1};
    //we are taking 15 samples
    for (int i = 0; i < 15; i++)
    {
        //7 to the left, self and 7 to the right
        float2 cord = float2(In.TexCd.x + PixelSize.x * (i-7), In.TexCd.y);
        //the samples are weighed according to their relation to the current pixel
        sum += tex2D(Samp, cord) * weights[i];
        //while going through the loop we are summing up the weights
        weightSum += weights[i];
    }
    sum /= weightSum;
    return float4(sum.rgb, 1);
}
为了在像素着色其中实现垂直的模糊,你可以复制PS()函数,并命名为PSVerticalBlur()把代码改为计算垂直的模糊,如下:
float4 PSVerticalBlur(vs2ps In): COLOR
{
    ...
        //7 upwards, self and 7 downwards
        float2 cord = float2(In.TexCd.x, In.TexCd.y + PixelSize.y * (i-7));
    ...
}
在effect中当前你有两个像素着色的函数所以你也需要两个techniques
technique THorizontalBlur
{
    pass P0
    {
        PixelShader  = compile ps_2_0 PSHorizontalBlur();
    }
}

technique TVerticalBlur
{
    pass P0
    {
        PixelShader  = compile ps_2_0 PSVerticalBlur();
    }
}
Like this you can use the two techniques alternatively but as mentioned before a better quality blur would be achieved if you'd apply the result of the first (horizontal) blur-pass as input to the second (vertical) pass... More on multipass effects comes after the next chapter.像这样你可以选择使用两个techniques,但是正如前面提到的要实现一个更好质量的模糊,你应当把第一次水平模糊的通道作为输入,到第二次垂直模糊的通道中...更多的关于多通道在下一章当中介绍。
Those were the basics of pixel-neighbour based image processing. But there is actually a whole range of similar effects which are commonly referred to as convolution/kernel filters. With things learned so far you should be able to progress in this direction on your own.这些是最基本的关于相邻像素图像处理。但是实际上有一整套相似的效果它们通常被称为convolution/kernel滤镜。用到目前为止学到的东西你能够自己在这个方向上进一步学习, 参见here 和 there 中更多的细节和案例.
Next: Multiple Textures
Back: Texture Coordinates
TOC: Of Effects and Shaders
anonymous user login

Shoutbox
~7d ago
~15d ago
~30d ago
~1mth ago
~1mth ago
~1mth ago
~2mth ago
~2mth ago